
Exploded Diagram of the (sometimes) Demon Brake Drum.
Brake Drum Removal, Inspection,
Reassembly Notes
first published 2/09/R. Kwas revisions
on-going [Comments Added]
General
Preferred
and Approved Puller Designs
Preparing for
Normal Drum Removal
Removing a Difficult
One
Inspecting Drum
Wear Lip
Reinstallation of
Brake Drum
Guideline for Tightening Drumnut
"Drums freeze"
An Inadequately Tightened Drumnut
The power of Hydraulics...
Metal Portobello
What's Worse than a Metal
Portobello?
The Last Word! [not anymore!]
Installing the Key Wrong
Two wrongs make a right!
Another Approved Puller
Is a Sliding
Hammer Puller OK to use to Remove Drums?
Finally
---------------------------------------------
General: Drums(1) do not rust* or seize or "freeze up" onto axle shafts (2) as a rule(!), the Drum hub is aligned by a taper and actually stretched onto axle as the 1 1/4" securing nut (4) is torqued (thread is 7/8" x 14TPI) , and this arrangement gives a tremendous multiplying advantage to the force applied by the nut, to secure the Drum...as well it should! The unified assembly of Axle and Drum, are the driven link between axle and the road, which needs to transfer drive power. Since no tightening torque spec is given for the castellated nut (as far as I've ever seen), a wide range of torques and resulting stretch and retention forces can result, and be encountered at next brake service, because the final position of the nut needs to be tightened until it aligns with the cotter pin holes, so final torque is dependent on the judgment and attitude of the guy operating the wrench!
*Presence of significant amounts of rust
on the Tapered Joint after separation can actually be evidence of movement
between the two parts and a sign of an inadequately locked together assembly!
See also:
An Inadequately Tightened Drumnut
Separating
Drums from tapered
axle against this substantial unifying force requires the application of an
even higher counterforce, and while removal can be one of
the most distressing and stressing procedures which must be periodically
performed in normal servicing, it doesn't need to be!
Exploded Diagram of the (sometimes) Demon Brake Drum.
Preferred and Approved Puller Designs: Drums are often difficult to remove and high, to sometimes, extreme levels of force are necessary to successfully separate the Drum and axle. With these levels of force required, it stands to reason that it be correctly applied only! Misapplied extreme force will damage or break things, instead of separating the components! Vintage Volvo Brake Job Rule No 1:
To remove Brakedrum, use a Drum puller of the approved designs ONLY!
Not using an approved puller will result in failure to remove drum AND/OR damage to drum and/or lug-studs to the extent that the Drum is rendered into scrap and will need to be replaced...and all this before Drum has even been removed!!!

Picture of the (one of the) preferred and approved puller designs. Dogbone striking wrench takes the abuse,
instead of your most favorite (and expensive) 1/2" drive breaker bar.
Yes, it only connects to 3 of the 5 wheel studs, which makes it necessary to
double-check and assure concentric alignment, because with only three wings, it
is not automatic, but that is typical. 5 wings would naturally be even
better, especially when dealing with a difficult Drum requiring maximum force.

Picture of a puller design which will not work (as it
simply hooks over the Drum edge, and will NEVER allow the positive transfer of
the huge forces required normally, to say nothing of the incredible forces
necessary on a difficult Drum!). This type of puller is most
definitely not approved,
and it will quite likely damage drum or itself.
Do not use or allow other
parties working on vehicle, to use this type of puller...EVER!
Horror stories of cracked drums edges (wrong, edge type puller used), bent lug-studs (wrong puller or correct puller, but misaligned!), wasted axle end or threads (nut not put back on to reinforce axle shaft when extreme force was necessary) and having to cut the drum off with cut-off grinders or oxy-acetylene torches, when everything failed, abound! Just for fun, I asked for stories on the Brickboard Link: http://www.brickboard.com/RWD/volvo/1330565/120-130/demon_brake_drum_removalseek_stories_removal.html ...responses ranged from pretty funny to informative.
Significant force is always necessary (even when Anti-Seize (AS) was been applied to tapered axle shaft during last time drum was assembled), high force is sometimes necessary (no AS was applied to shaft at last reassembly), or extreme force and time under high tension load (no AS was applied AND nut was overtorqued by a primate mechanic...maybe even with an air-wrench!).

Picture of a homemade puller also of an approved design
puller (nice job!). It uses the same principle of attaching to the lugs, and is
even nicer in that it is just about impossible to misalign. Picture used with
permission, thanks and credit
to Martin "Mcoldie" of the Volvoniacs Forum.
Impact is your friend (aka: Shock and Awe at Work in the Garage!): Many pullers also make use of the advantage which impact brings with it. After mounting the puller and making it a solid, concentrically aligned part of the drum, a threaded center shaft pushes against the axle (straight and concentrically!). This center shaft has a striking wrench intended to receive blows from a hammer and transfer these as huge pulses of torque onto the nut, which translate into mega pulling pulses on drum. Usually this brings the desired separation pop. Alternately, an air-wrench can be used on this to supply an irresistible force necessary, plus impact!.

A result of shock and awe in the garage gone wrong. Ouch!
Time under tension: Sometimes, in extreme cases, or in cases when air-tools are not available, or when after a session of whacking the striking-wrench, it just feels like the striking wrench is totally solid when it is struck such that nothing seems to move, a rest is called for...a rest for the mechanic, and a rest for the joint. Often if left over night, under the continuous substantial tension of the puller, temperature variations are enough to explosively separate the drum with an impressive sounding report, not to be confused with ôshots firedö!! The quick release of all of that pent up force has also been known to be able to send the puller/drum assembly across the garage, if nut has not been turned around after loosening, and loosely applied back onto the axle shaft. To avoid damage to other garage inhabitants, human or otherwise, a heavy rag draped over the preloaded assembly when one leaves it for the night is a real good idea anyway!
Preparing for Normal Drum Removal: While corner is still on the ground, and tire contact with ground keeps wheels from spinning, remove hubcap for access. Break the initial hold of lug nuts, so that they can more easily be fully removed once corner is in the air.. Remove cotter-pin and loosen nut (1 1/4ö) only. Lift and support corner of vehicle securely, remove wheels and drum securing nut rest of the way, replace nut back on axle, turned around, with castellation first, to reinforce axle shaft end. With gearbox in neutral, Emergency Brake not engaged, and manual adjustor backed of if possible**),. install a puller of the approved designs, and apply irresistible pulling force correctly with it, until it separates from axle.
Removing a Difficult One: In the worst cases, preload puller to the maximum pulling force you dare, and leave over night (after first spraying some penetrating solvent like Croil, Liquid Wrench, PB Blaster, WD-40(listed alphabetically) onto the drum-hub and axle joint) ...if drum hasnĺt separated on its own (often with an explosive report) by the next day, heating the hub with a torch to add some thermal expansion to the mix will likely get the job done. Draping a rag over the assembly will contain the assembly and dampen some of the mechanical violence when it finally does ôlet goö...so will putting the castellated nut back on (which is highly recommended anyway as it reinforces the end of the axle shaft from the serious forces which will be applied...compressed threads on axle shaft-ends are not unheard-of! See: Metal Portobello), replacing the nut will also prevent the drum/puller assembly from possibly launching itself across the garage and paying a high-speed visit to the wifeĺs new car!.
** The manual adjustors adjust the rest position separation spacing of the brake shoes. IF these are free and clear to operate (meaning the reader has either new ones - great - or has previously freed and lubed them well with AS per my recommendations), then they should be backed off to the end when they canĺt turn anymore counter clockwise, before attempting drum pulling. It should be noted that adjustors DO NOT influence the force required in initially breaking the axle/drum hub bond, because this force is strictly determined by the hub-stretch, but they do make a big difference in removing the drum once the initial hold has been broken, because the shoes donĺt have to clear the wear lip. I do also recommend removal of Wear Lip once everything is apart...and why if someone has seen the advantage to rebuilding the adjustors with anti-seize, but hasnĺt also heeded the advice to apply it to the axle taper, or grind away a significant Wear Lip, would be beyond me...
Once the Demon Drum has separated from the Axle: [These are some recommended steps which are in addition to any brake inspection or service which the drum needed to be removed for in the first place.]
Inspecting Drum: Once a drum is removed (and your blood pressure has
returned back to normal) it can be measured to see how much it has worn, and
what its inner diameter (ID) is. If you donĺt own a 9 to 10ö inside micrometer,
I have designed a handy template which can be printed, applied to a cardboard
backing, cut out, and used to measure the ID effectively. Accuracy to one
thousands of an inch is just not necessary.
PLACEHOLDER:
LINK to 9-10ö inside Micrometer.
Coming...so's Christmas...in the meantime, here is a graphic to give an idea of
the measurement. Be careful to not be fooled by the
Wear Lip...measure
inside of the Wearlip (see below!).

Measuring Drum ID. Don't be fooled by the Wear-Lip! See Below!
Source: Autozone.com
Drums with excessively worn IDs should be replaced as they are at risk of failing by cracking (not so good for braking!), and they also require the wheel cylinders and shoes to be separated beyond their designed normal working dimension range.
Friction Area Condition: Some circular grooves are always present. So
what! Do not unnecessarily machine drums! Even the most
terrible wear-groove is no reason to remove material in the writer's
opinion...Note: The metal you machine off
today will require you to replace the Drum that much sooner tomorrow!
Wear Lip: I recommend grinding off the wear-lip which is formed because the shoes donĺt make contact right out to the Drum edge...this will make disassembly and reassembly easier as shoes donĺt need to be compressed for Wear Lip to clear drum edge when replacing Drum...then again, adjustor should be backed off when new shoes have been installed so this shouldnĺt be an issue on reassembly. But repeating: This lip has ZERO to do with why a puller is required break the Drum/axle bond!

Condition of Seal Contact Area: Inspect the contact area and if necessary, use a mild abrasive (Scotchbrite pad or similar) to clean away surface rust which will abrade felt seal rapidly. If key has been installed wrong (taper not first or not towards axle) it WILL cause damage in the form of a split with displacement in this seal contacting area, continuing from keyway in hub. This will hurt the seal felt also.
PLACEHOLDER FOR PIC
Reinstallation of Brake Drum: My normal reassembly practice is apply a very light film of graphite containing AS to the tapered axle shaft*, then place drum on shaft (which has previously been turned such that keyslot is at about a 12 oĺclock position), then rotate drum with respect to shaft until its keyslot aligns with that of shaft, install key (insert tapered end first and with taper toward axle) by tapping in until it is just below flush with washer and nut bearing surface, then installing washer and spinning on nut until hand tight. Perform these steps with vehicle in gear to prevent axle rotation, snug nut, but do not bring to final torque. Proceed with shoe and Emergency Brake adjustments, and leave final torqueing of axle nut for when wheel is back on and that corner is back on the ground to prevent turning. Some judgment is called for here...since the nut is castellated and a cotter pin should safety the nut, I generally tighten the nut (after it has been first snugged) to the next clear alignment position with a 1/2ö drive and 1 1/4ö socket (two holes are available in shaft, one at the key-slot, and one 90 degrees to that...which results in manageable angular increments of 30 deg). In the worst case, if it just ôfeelsö like the nut needs to be tightened too much in order to get to an alignment position the washer can be thinned slightly by grinding on a flat plate with emery cloth...but this is typically not necessary! As a general guideline, the final tightening torque should be somewhere in the 80-100ft/lb area.
* How does AS work specific to axle-to-drum hub joint? Using anti-seize on the tapered axle to drum hub interface will still allow the alignment and stretching which assures proper unification of the parts and safe function as designed and intended, but the film, containing the stratified graphite particles which easily shear apart, serves as a release agent which never allows the astronomical coefficient of friction which occurs when it is not present. It is this coefficient of friction which the puller must overcome to release drum.
Guidelines for Tightening Drumnut: Although no Torque is given for the Axle Nut, a guideline is to tighten Nut to 80-100 Ft-Lbs, then continue tightening until an alignment opportunity for the Cotter Pin occurs. Beware, some Axle shafts have a single hole, some two at 90Degs to each other...that gives alignment opportunities in 30Deg increments which works out well.
Tighten the Drumnut Adequately, or else! See: An Inadequately Tightened Drumnut
Additional Notes on Installment of Drum:
Although no tightening Torque is specified for the Drumnut, experience has shown this should in the 100FtLbs range. Yes that is a lot, but considering the size of the Axle shafts (3/4 OD) and the critical nature of the connection, this is appropriate!
Recently, a Volvoniac Forum member was experiencing an audible clunk after Drum reinstallation, when going from power, to overrun. It turned out he was apparently a bit shy and gentle when tightening his Drumnut...even reporting that when he couldn't make the next cotter pin alignment opportunity, he backed off, and used the previous one (rather like what one might do on a front wheel bearing, which is a totally different situation and where this is recommended!)...so the Drum was not really intimately connected to the Axle!
The clunk which subsequently occurred confirms that Drumhub was not stretched over the Axlecone in a united connection, and the Key was the only thing stopping the slipping of the conical connection (instead of transferring power), and banging back and forth in its slot...clearly bad, and not at all the intent of the design and the way it should work! The Key is only intended to keep the alignment while stretching the Drumhub over the Axlecone while tightening the Drumnut...this assures concentricity, but after that it really has (or should have!) no function.
Link to Thread - Bremstrommel: Spiel-Regeln? http://www.networksvolvoniacs.org/index.php/Spezial:AWCforum/st/id8191/limit:0,15/#last
This experience leads me to add some further Drum Installation Notes:
1. Prepare Axlecone and Drumhub for reassembly, by wiping clean and inspecting for any damage or galling. Apply a minimum film of graphite filled grease onto the Axlecone before installing Drum, with keyslot aligned. Install key with tapered edge in and towards Axlecone, and tap it home to just below Drumhub surface. Install Washer and Drumnut, and tighten, checking Drum position with respect to Backing plate.
2. Tighten Drumnut to the 80FtLbs minimum torque range, until an opportunity for cotter pin alignment is reached...never back up! (Note: Some Axles have two cotter pin holes, at 90Deg to each other, giving more alignment opportunities.)
3. When at a tighening torque of around 100FtLbs and castellated nut slots are aligned with Axle through-holes, install Cotter pin in the normal manner.
------------------
Comments are welcome!
-------------------------------------------------------
Additional Brakedrum Notes:
[From the Torque-it-until-it-breaks,-then-back-off-a-half-a-turn Dept.] In response to a post...I disagree that greasing the axle taper causes the hub to split...it's grease in combination with excessive torque on the hubnut imparting irresistible splitting force to the hub which causes breakage! ...I mean what do you expect it to do?...it has no place to go...it MUST split if you keep tightening the nut (reminds me of splitting pipes with freezing water in January...somethin's gotta give!)! With the force multiplying which is taking place due to 1. Nut thread pitch, and 2. Taper (Iĺll call it Effective Inclined Plane Angle) - (and presuming a halfway lubed system, so friction is not a huge factor), applying a torque of 100ft/lbs to the hubnut translates into thousands of lbs of force trying to split the hub wide open!...and it will obviously do this at the stress riser presented by the keyway.
My suggested procedure for refitting the brakedrum: Rotate the axle shaft such that the keyslot is at the 12 o'clock position. Apply a light film of anti-seize to a clean axle taper, and place drum (whose matching inner taper has also been cleaned), without key, onto axle. Rotate drum as you seat it on the axle taper watching for out of round effects as it is rotated, and finally stop when keyslots line up. Install key, also prepped with light film of AS, and insert beveled surface first and toward axle. Tap into position until end of key is just under washer surface of drum. Install washer and castellated nut, and torque the hubnut to around 80+ ft./lbs. (no torque is specified).[See: Drum Nut Torque inconsistency Explained below!] Then, continue torquing to the next available securing pin alignment opportunity, and finish by installing securing pin. ůand visit a fitness club and punch around some dead weights, or maybe the backyard and split a cord of lumber to expend your excess energy, so you expend a little less on your poor car torquing that nut on like an animal!
I believe from my experience, that there is a significant difference and advantage to be realized in using anti-seize over grease on the taper. Grease, because it is not a solid, gets displaced until the hub and axle are making contact. Add to that, the substantial mechanical advantage that the wheelnut has to tighten the two together until the drum literally stretches over the tapered axle (and not so much as to split it!). At that point any grease has most certainly been displaced and intimate metal to metal contact exists (and this is required to assure concentric alignment of the two!).
The condition resulting when using (the thinnest film of) anti-seize is similar but with an important difference. The grease component certainly also gets displaced, BUT the miniscule particulate graphite cannot...think of that stubborn silver film which gets all over seemingly everything when using it. It therefore remains between the hub and axle at a microscopic scale, still allowing the and given graphite's layered crystalline structure, and these particles are all too happy to be sheared apart, when the puller applies this force, to allow the two parts to separate.
Add to Ser Notes: Impact works to your advantage...use an air-powered ratchet on the drum puller...the repeated impacts are just what is called for to remove a stubborn drum!
-------------------------------------------------------
Drum Nut Torque inconsistency Explained:
My further explanation of the inconsistency of torque values for the Drum nut In response to a FB poster pointed these out:
-------------------------------------------------------
Reference Info/Links:
I recently ran across this...he uses what appears to be a homemade puller of an approved design, and I actually enjoy listening to the kind of melodic step-by-step explanation in Swedish!

https://www.youtube.com/watch?v=nwDy6WCeKGw
(Time-stamps) Key points to note:
0:35 Adjustor
0:53 Adjustor tool options (see also:
Manual Adjustor Tool)
1:50 Loosening Adjustor (if possible)
3:00 Preparing for installing Puller
5:44 Replacement of Drumnut (surface flush with Shaftend!)
8:38 Installing Puller
9:12 Application of Steady and Impact pulling force
10:40 Removal of Drum
11:09 Pointing out Trailing and Leading (11:17) Brake shoes (there is a
difference!) See:
Front Shoe, Rear Shoe
--------------------------------------
Another video for a jeep drum removal is applicable to vintage Volvos also: https://www.youtube.com/watch?v=PQQvFK4B6pY ..it shows all of the important steps (except for replacing the castellated nut loosely), and he has a pretty easy time of it...(I expect he loosened it before they filmed the video).

-----------------------
Link to VOC Thread: Seized brake drum http://www.volvoforums.org.uk/showthread.php?t=256050
An extended discussion about removing an absolutely miserable Drum, with good details presented. Short of "nuking it from orbit ...it's the only way to be sure" [Ripley, Aliens], any non-damaging method will do!
-----------------------
Skandix Brake Drum Removal Presentation: http://www.skandix.de/en/documents/application-advice/brake-drum-puller/3000274/ :
Generally also a good and informative presentation...my only comment refers to Picture 3. Replacing the Drumnut. The point is obviously to reinforce the Axle-end such that it can stand up to the massive compression forces exerted by puller, and doesn't distort or mushroom...remember the Axle-end is drilled for a cotter-pin and therefore definitely not as strong as a solid shaft...because of that, I prefer to turn around the Drumnut, because if force enough to mushroom the Axle-end is being applied, it would surely also be enough to splay open the slotted ends of the castellated nut...but never the circumferentially continuous other end! This is a minor point but in the case of applying absolute maximum force, it may make the difference between a successful operation or a damaged Axle-end!

Close-up of Skandix Pic #3.
-----------------------
Drums "freezing up" (Excerpt from an e-mail exchange with Brian H.):
...given that I know you like anti-seize, that the above site sells a very high heat ceramic version of Permatex anti-seize. I never see this product in XXXXXX, and have only known about it for a year or so. I thought this would be THE product to use on a rear axle when re assembling a brake drum on a 122. - The drums that annually freeze up.
My response: I must be nit-picky here...Drums do not "freeze up"...this is incorrect terminology used by someone who should know better... Reiterating: Drum hub must be stretched over tapered axle for a positive, bidirectional, concentric, high-power-capable coupling, and this is done through the very high forces generated when tightening Drum Nut...so separating the two requires equally high levels of properly applied force...there is nothing wrong or improper about this...only when the required forces are applied wrong and not according to the well documented procedures and techniques do problems occur!
..."ceramic version of Permatex anti-seize" ...again, I prefer Graphite filled greases for the shear properties because of the structure of the graphite molecule...it works well to make this otherwise stressful procedure a lot simpler and less painful, so I have no reason to want to replace it with another material...but I'd be happy to take a look at a link...
-----------------------
The Other Hand of the Coin...An Inadequately Tightened Drumnut: This is also bad...to say nothing of the Cumulative Cyclic Stress happening at the joint!

Discovering rust when removing a rear Hubcap means Drumnut was not tightened
adequately to stretch Drumhub onto Axleshaft, and there was relative movement!
Source: Swedespeed Forum Link:
http://forums.swedespeed.com/showthread.php?123266-I-guess-I-ll-be-posting-in-here-more-often

If your Tapered Axle looks like this upon removal of the Drum, Drumnut was
not likely tight enough!
The Hub must certainly be stretched onto the Tapered Axle and if not,
this will allow relative movement
between the two, generating the telltale rust-dust.

Even tapered Volvo Axles of Swedensteel have been known to fail!
Lets get the tightening and loosening of the Drums RIGHT!
Picture by Christopher of the Volvoniacs.org forum.
-------------------------------------------------------
Drum Removal discussion with some good info, but also some not so good info, and after reading the above notes, the reader should know which is which! http://barnfinds.com/122-project-update-brake-job-halted/
-------------------------------------------------------
My response to a forum posting ( http://www.volvoforums.org.uk/showthread.php?p=2243590#post2243590 ) [comments not part of original posting added] :
WOW! That is the most impressive Drum Puller I've seen to make the
irresistible force necessary for some stubborn Drums on a Volvo! (No!, I am not
the one offering it (on ebay), but the price seems reasonable even, for what one is
getting: The ability to persevere against even the most stubborn Brake Drum!)
When using it, be absolutely certain you put the Drum Nut back on loosely (castellations
IN), to reinforce the halfshaft, lest that irresistible force turn the end of
your Axle shaft into a metal Portobello! ...in looking at the listing, it
states: "Hydraulic"...so I had to think about it for a moment...and here is what
I came up with...it works by means of the (almost miraculous) principle of
Hydraulic Force Multiplication [...of
course, this Force Multiplication comes at the cost of Displacement. The
output piston will move less than the input piston, by the inverse-ratio of
their areas...in physics, it's always a trade-off and you don't get "nothin' for
nothin' "!] :

Hydraulic Force multiplication is a splendid thing...especially when used to
remove stubborn Volvo Brake Drums!
...and to retract it, I would start by unscrewing the input piston...the unit
might have a self-retracting provision...I've drawn in (orange) a retractor
(compression) spring which might be in there...of course, on the other hand, it
could also be a tension spring on the other side of output piston. If it doesn't
self-retract, I'd try backing off the input piston, and pushing the output
piston back in...worst case, squeezing it together in a press...
I advise you work carefully and methodically when wielding the "Power of
Excalibur"!
Good Hunting!
See also:
http://www.sw-em.com/Brake_Drum_Notes.htm
PS. Seeing as this is I expect one of the most (if not THE most) powerful Drum
Puller in existence, I request your permission to include and republish your
pictures of it on the SW-EM site.
PPS. As far as that case vs a blow moulded case (with a "live hinge", right up
until it dies). I'd prefer it in a nice case...you wouldn't put Excalibur into
Mc Donalds Styrofoam container would you?
------------------------
Picture of PoMaIF (Puller of Magic and Irresistible Force), installed in preparation for applying that irresistible force:

Hydraulic Drum-puller in action! See YT video:
https://www.youtube.com/watch?v=7Zuhbvl_JnY
Vintage Volvo owners are not the only ones who need to use high force to pull Brake Drums. Here a setup using hydraulic force on what looks like a VW Beetle Wheel and Drum...I like it...it shows ingenuity, and is actually a very reasonable design (I hope the white plates are made of metal and not plywood!).

Another example of hydraulic Drum-pulling. Source: The VW world.
------------------------------------------------------
LINKS:
My post to thread:
jw; "How the heck do they get so stuck "...they are not
stuck...they are (intentionally) stretched onto the conical joint, by
the action of tightening Drumnut (which has a massive advantage), as
explained here:
http://www.sw-em.com/Brake_Drum_Notes.htm
Galling at the interface between axleshaft end and puller shaft, can occur, but
can be eliminated by a dab of Graphite Grease. As a mater of fact, with all
these mega-forces in use here, application of GG is recommended to protect all
high force bearing areas!
...and BTW..."I blew it on the tighten the lug nuts really well, the first time"
...massively tightening the arms of the Puller is no even critical, as it
doesn't add to the force of the Puller, it only locates it, and transfers the
pulling force...don't worry, you won't pull the Studs out (but for applying
maximum force, it is recommended to bottom out puller arms to prevent the
possibility of bending studs...but overtightening is just NOT necessary!)...I've
pulled Drums with the arms not even bottomed!...what is critical is that all
arms are equally positioned to assure concentricity of force application!
tm; "What makes them stuck is years of being together"...that suggests corrosion
is the mechanism at work, and that is not typically found once the joint is
broken and inspected, so I can't agree here, sorry...what makes them extra tough
to separate is the nut having been unnecessarily over-tightened (my
reference torque range is 80-100ft-lbs, naturally adjusted as a function of
cotter pin slot alignment), and not using the slightest film of graphite on the
tapered joint at reassembly time...yes, qualified and seasoned machinists might
point out that a tapered joint is not supposed to have any lube, but I and my
cars live in the real world, were I have to get these joints apart again, and
graphite helps here without a doubt, so I deviate from the official machinists
handbook for the sake of practicality...
-------------------------------------------------------

A metal Portobello...the result of not reinforcing Axleshaft by
reinstalling Drumnut, before applying MEGAFORCE...unnecessarily
and massively complicating a simple Brake-job!...one can just imagine the forces
necessary to mushroom a 7/8" shaft at ambient temperatures!
Excerpt of an original picture by Sebastian Macho.
Wenn Deutsch deine Muttersprache ist...deine Situation ist das Resultat wenn mann die Welle nicht vor dem Abziehen, und anwendung Himmelhoher Gewalt, mit der Mutterleicht drauf geschraubt, die Well verstaerkt wird...ich weiss das hilft in diesem Zeitpunkt wenig, und ich moechte das eingestochene Messer nicht zusaetzlich drehen, dies muss aber dies erwaehnt werden, denn es MUSS aus so einem Disaster gelernt werden!
------
What the above essentially says is by not turning Drumnut around and
reinstalling it onto threads to reinforce the shaft-end before applying
MEGA-force, this operator has significantly increased the scope of a simple
brake-job...and, its better to ask (or at least research) BEFORE applying
MEGA-force!
------
Metal Portobello Repair:

When Ben B. found his axle threads too distorted, after another extreme Drum
pulling operation, to be able to reinstall the Drumnut, he used this thread
cutting tool (AD 10, by Mac Tools) to recut the threads. The nice thing about
this tool is that it does not require removal of the Axle, and it can be clamped
on behind the damaged area (in the case of a mushroomed shaft with
increased OD, even loosely at first), and turned CCW to clean up the threads
back to the shaft end. Quite Brilliant! Picture by Ben B. and used
with his kind permission.
How do you remove Axleshaft for replacement or repair when Drumnut can no longer be installed? My concept shown below, intended to remove Axleshaft without doing further damage, so that the option to reuse shaft after repair of shaftend is retained:

-------------------------------------
What's Worse than a Metal Portobello?
...a split axle, plus Portobello, that's what!
Cause AGAIN: Improper Puller and technique!


Just imagine the forces necessary to split a shaft like that...and the primate
mechanic which allowed it...!
"Two things were done (very) wrong * :
PS: ...from second pic looks like the Studs MAY have been bent also...this must be checked and if confirmed, also needs sorting!"
Additional: ...but most pullers have a
conical point which assures centering into negative cone in the end of
shaft...but it looks like cone of puller was larger than receiving cone in
shaft...this results in a splitting force being applied, with those results...
Ed - can you please post a close-up picture of axle shaft so I can confirm this
from witness marks.
More [...and
The Last Word]: (in answer to question on why Drums have to be "forced onto halfshaft so tightly in the first place".) "...because
that is the (correct!) way a tapered shaft joint works, and not only Volvo but
also Jeep and others used it back in the day...in this arrangement, hub is
literally stretched onto conical shaft...this assures a perfectly concentric
joint, capable of transferring high power, but it does take the CORRECT and
approved puller to break this joint apart come brake service time, and many shops don't have the
experience or know-how, or proper puller to do it without damage, because modern cars
do not use this style any more...the studs are typically part of the half-shaft,
and Drum has holes for them and is sandwiched in between hub and wheel...no
pullers necessary!
When it comes time to do your rear brakes, don't fret, but do it with a puller
of the approved designs, using correct techniques...thousands have done it, and
continue to do it periodically and successfully and without mucking it up.
See
link! Cheers"
-------------------------------------------------------
...another way of getting it wrong...Installing the Key Wrong!
When installing the Drum, the key must be installed beveled edge In and Down and tapped home such the Key-end is below flush when installing the Washer and Drumnut. If Key is installed otherwise, the Drum-hub can be displaced which results in damage to the Seal surface as seen here:
Picture by Mike Halley and used with his kind permission.

Result of improper Key installation. Not pretty but it can probably be
repaired
and Drum reused IF the Seal contact area can be made round again.
PLACEHOLDER FOR GROOVY GRAPHIC DETAILING THIS ISSUE
My response to Fp
![]() posting:
posting:
"That deformed area at the end can be carefully formed back into place (by judicious beating with a 3lb hammer until it is flush again...and ground if necessary and polished with emery cloth to make it perfectly round again so it doesn't chew up the seal)...but that damage is only at the end of the Hub and very limited. I would have NO QUALMS about repairing and reusing this Drum...yeah, it would be nice if the hoople last "mechanic" hadn't put the Key in wrong which caused this, but IMO this is no reason to replace this Drum! Cheers".
------------------------------------------------
(This toy of a) puller...(Wrong No. 1), installed pulling on the Studflange actually was able to separate the Drum from Tapered Axle!...proving that...(Wrong No. 2), the Drum was inadequately stretched over the Tapered Axle to begin with!

------------------------------------
Ultra-beefcake Puller design (by KUKKO). All five Studs are pulled on, and a simple piece of diagonal "C" channel to the ground provides counter-torque.
Teun van Popta picture, posted with his kind permission.

------------------------------------------------
Is a Sliding Hammer Puller OK to use to Remove Drums?
Short Answer: It is NOT!
Gustavo Adolfo pictures used with his kind permission.
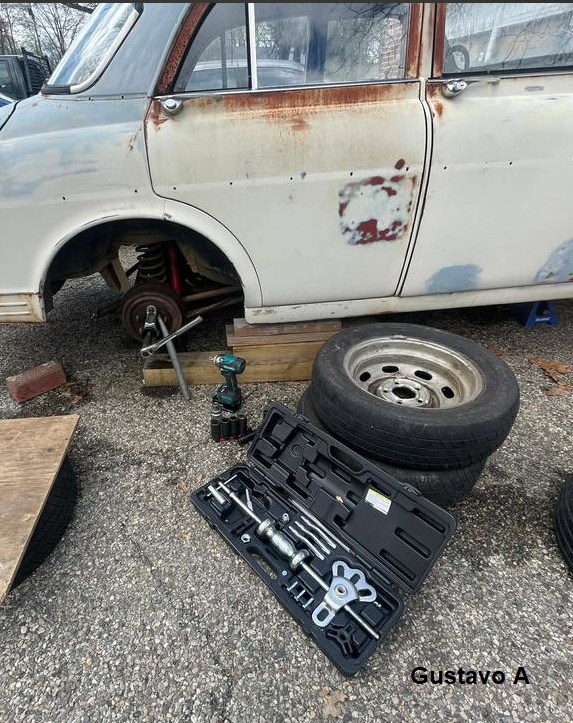
In reviewing a picture posted by Gustavo in Apr 2022, I see he has used an impact inertia type puller in efforts to remove the Drum from the Axle. Please note, that this type of puller is NOT APPROVED for this operation, because it is not really a good tool for separating the Drum from Axle, sorry!
Explanation: Before they are separated, Axle and Drum ARE ONE(!) due to the interference fit tapered joint, so when using this type of mechanical (impact) pulling force tool, and applying impact force to the pair, the force is applied not only to the Drum/Axle joint we are trying to separate, but also to the Axle/Bearing interface, which UNNECESSARILY stresses contact surfaces in the Bearing...THIS IS NOT SO GOOD! The high impact forces should NOT be applied to the Bearing, but ONLY Axle/Drum interface...and that is precisely what the approved pullers do: They push on the Axle, while pulling on the Drum...AND NO MORE...ALL impact forces are concentrated where they are needed, and nowhere else!
My Recommendation: ...is NOT to use one of these style pullers, eventhough one might be tempted to, after initial "Plan A" efforts to separate Drum from Axle with an approved puller have failed! Leave the puller in place, and under high preload, overnight...if the joint has not separated (with a report!) in the middle of the night, apply more impact and preload the next day and wait another night (and thermal cycle!)...and if still "no joy", as they say, and you need to go to "Plan B", and up the efforts to the next level, heat the Drum hub (again, while under high preload, with a torch to expand it and create a thermal difference between Drumhub inner cone, and Axle outer cone (this is obviously only possible with an open style puller, not with a closed style!).
Repeating my advice: Use ONLY one of the approved pullers! (Note ONLY is bolded, enlarged, and underlined...I can do little more in the way of emphasizing!).

Sliding hammer puller did work to separate the Drum from Axle, but I fear for
the poor Wheel Bearing!
------------------------------------------------

An old picture of me after three days of trying to remove the Brake Drums,
onto
which I had not yet applied Anti-Seize...now it takes a lot less time, and takes
a lot less out of me!
------------------------------------------------
External material sources are attributed. Otherwise, this article is Copyright ę 2001-2026. Ronald Kwas. The term Volvo is used here for reference only. I am not affiliated with Volvoůalthough I do also Rollů.or Permatex/Loktite When did jungles become rainforests? When did Personnel become HR? I have used the procedures presented here in practice many times myself but they are presented strictly as a guide to be used in conjunction with normal, cautious, shop practice...your results may vary...and you are, and will always be, responsible for your own actions and knuckles! Itĺs a car, not a phone-booth! If you lived here, youĺd be home by now, blah, blah, blahů
You are welcome to use this article and its contents for non-commercial purposes. But if you copy and republish it, whole or in part, without giving credit to the author, or linking back to the Sw-Em site as the source, youĺre just a lazy, scum sucking plagiarist! Go work for the Washington Post or something!
-----------------------------------------------
