
One of the low moments of vintage Volvo ownership.
Ignition Switch Position 4.
Ignition Switch Key
Breakage Tech Article
Originally posted Nov
2014, revisions ongoing. R. Kwas
[Additional comments]
---------------------------------------------------------------
Broken Vintage Volvo Ignition Key... immediate actions and options.
--------------------------
Correct Terminology
Unique Armored Ignition Assembly
Broken Key Syndrome
Gorilla
Spring
The Lock Cylinder is a Gearbox!
Additional Information:
Extracting a
Broken Ignition Key
Lock Cylinder Removal
Leaving Ignition ON with Engine not Running
Ignition Switch Positions and
Function
Ign Key
not turning to the Accessory (Pos 1)
Keys Broken by Third Parties
Late-Production Ignition
Switch
Reference
Information
Gallery of Damaged and Broken Ignition Keys
Broken SAAB Ign Keys
Link: 122 Ignition Switch Dashboard plus Steering Column Special Configuration Notes
---------------------------------------------------------------
Background: As this is an often discussed topic on the Fora, usually after a new owner posts of having broken a key, or looking for advice on what to do when one breaks the Ignition Key in the Ignition Switch, and I answer, finishing with a recommendation to “install a SwEm Kit Pushbutton Start Switch to prevent reoccurrence”, I thought it was time to do a bit of an in-depth-analysis and root-cause-investigation on the subject…
One of the low moments of vintage Volvo ownership.
Ignition Switch Position 4.
Please Use the Correct Terminology! For the purpose of this article (and I suggest any discussions on this subject elsewhere) the Ignition Switch Assembly consists of the *Lock Cylinder (LC) and Electrical Switch section (ES). ["Tumblers" are components internal to the LC, and of interest only to Locksmiths, or anyone working on the internals of the LC].
Unique Armored Ignition Assembly: The Bosch supplied Ignition Switch of the Volvo 544, 122, 1800 vehicles are unique in several ways. The Ignition Switch (IS) is actually part of an assembly combined with the Ignition Coil, and both are permanently connected by an Armored Cable. LINK With this arrangement, the Ignition Power node could be made internal, inaccessible and completely protected within the assembly. It is therefore impossible to “Hot –Wire” these vehicles, or Start the engine without the Key applying power to the Ignition System. At the Ignition Coil located in the engine compartment (refer to graphic below), the observant reader will notice only one terminal in addition to the High Voltage output, where typically the Ignition power node would also be located.
Another way the Ignition Sys differs from other systems of the day is that it has no Ballast Resistor. Lack of a Ballast Resistor is outside the scope of this consideration and covered elsewhere on the SwEm site. LINK1
Also, the difference this article will concentrate on is that the force required to turn the Key into the momentary Start Position (4, see: Ignition Switch Positions and Function below!) seems the highest of any vehicle I’ve ever experienced.

FIGURE 1. Ignition Switch/Armored Cable/Coil Assembly
Security: The inaccessible Ignition Power node was an effective anti-theft measure of its day. Unless a thief had the forethought to bring and wire in his own Ignition Coil, or had access to a flatbed car-mover or cargo helicopter with which to airlift the vehicle away, I don’t suppose too many of these vehicles got stolen.
Broken Key Syndrome: A weakness that a number of owners have unfortunately experienced firsthand, which develops after years of ownership (and more specifically, thousands of times turning the Ignition Key), is that it is not uncommon for the Ignition Key to twist off as one is turning it to the momentary Start position. Inspecting the failure site on the Key, it looks like the breakage is a result of Cumulative Cyclic Fatigue…it’s a real bother, but I believe well understood and explained at this point and addressed by Preventative Measures! From the first day of ownership, it always seemed to me that the turning force required to go to the Start position was on the high side…years later, when I broke my first key, confirming my suspicions that the key was overworked, did I think about it, recognize and accept the cause as Cyclic, Cumulative Fatigue and coin the term “Gorilla Spring”.
Why is the Gorilla Spring so strong? The Gorilla Spring is a spring whose function it is to return the electrical starting contact of the Ignition Switch from the momentary Starting Position 4 back to the Ignition ON Position 3 after engine has started and the Key is released. (See: Reference Information - Ignition Switch Positions and Function below). I expect Bosch engineers felt it important to assure the Gorilla Spring disengages the Solenoid contact, as failure to release it would keep the Starter/Solenoid engaged which would be a pretty big problem. (Link to Starter Tech Article: Solenoid Non-Retraction ).
Lubrication Issues: Keeping the LC well lubricated so that it doesn’t contribute any appreciable counterforce to being turned is certainly important. I suggest Tri-Flow light non-synthetic, Teflon containing oil for this. Tri-Flow has a high film strength, and works splendidly in this application. I have yet to see it gum up or disappoint in any way.
The ES was lubed at construction and as it has sealed bulkhead between LC and the ES, it is not possible to add any lube here. Having disassembled switches and looked behind the curtain, the grease used does tend to "dry" somewhat (what does one expect after half a century?), but I have not seen it add appreciably to the force needed to turn the ES. The sealed bulkhead also means that no amount of lube applied into the LC will serve to lube the ES decreasing the force needed to turn it…of course, no amount of lube will change a spring’s spring-constant anyway!
"Weak Keys" are no Explanation. Broken Volvo Keys have been explained (wrongly!) in that they are somehow weaker than other keys…this is just not the case! Volvo Ignition Keys are of typical construction and strength and available various metals …from aluminum to brass, to chrome plated brass, to steel, and they all seem to break...so it’s pretty clear that it is not weakness of the Key, but the overwhelming cause is the Gorilla Spring in the Ignition Switch itself. Since the mechanism of failure is cumulative metal fatigue, the specific metal key is made of only serves to vary how many cycles the key will survive before the inevitable breakage.
…so the Big Question
is: What is different between the Bosch Ignition Switch Assembly and millions
of automotive Ignition Switches in existence, which makes the Volvo one
predisposed to eating Keys?
My Answer:
The Lock Cylinder is a Gearbox! If the LC is removed from the Electrical Switch (See also: Additional Information: Divide and Conquer), so that the Tailpiece movement can be observed as the key is turned, it will be noted that the tailpiece actually turns through more degrees of arc than the key, so there is a “gearing up action” taking place. This gearing (up) effect of LC (seen from key perspective) is effectively a torque multiplier for the force of the Gorilla Spring …in other words, the Gorilla Spring (which is already a pretty beefy spring) has an additional mechanical advantage over the key due to this gearing, and this turns out to be the big contributing factor to the fatigue.

FIGURE 2. Key vs Tailpiece Angular Travel
Study Setup. Lock Cylinder is secured in soft-jawed vice (Key
removal/insertion position vertical), color coded stick extensions have been
temporarily added to Key and Tailpiece, and angular travel is marked on paper
behind (on-axis!). Not super accurate, but quite effective to make the point.
Note also that in the picture, Key is shown in Position 4 without any force
necessary to keep it there. This is because the LC is uninstalled so Gorilla Spring
is not even present to act on the tailpiece and return it to Pos 3.
My careful measurement of the rotation of the Key (90degrees) vs. the Tailpiece (120degrees) calculates to a ratio of 1.33. This is the additional mechanical advantage of the Gorilla Spring over the key, because looking at this system from the standpoint of the Gorilla Spring it means that any torque which needs to be applied to the Key to turn it against the Gorilla Spring, must be divided by this ratio…and the force of the Gorilla Spring we feel when turning the key is also amplified by this ratio! In other words, the key must supply MORE torque than if the turning action was connected directly at 1:1. It's a losing proposition for the key, and this is the big difference between this particular LC and Ignition Switches of other vehicles. My locksmith reference (thanks Paul S.!) informs me that this gearing within the LC is unique to vintage Volvos, (and apparently also vintage Saabs, confirmed by my vintage Saab specialist acquaintance Paul M. See: Broken SAAB Ign Keys ).
Given this design weakness, I make the statement that "All vintage Volvo keys will break eventually!" Those owners who have not yet had this less-than-wonderful experience, can consider themselves lucky, but can still expect breakage in the future, after their key has accumulated some more stress cycles! See: Additional information: Cumulative Cyclic Fatigue

See also: Reference Information
----------------------------------------------------
Related Links:
After you install one of these gorgeous, shiny new, reasonably priced new Lock Cylinders from CVI, you will still be best served by installing a SwEm Kit Pushbutton Start Switch which will leave that new key looking great and operating without fatigue, for a long, long time...probably to outlive you!

Source: CVI's site: http://www.cvi-automotive.se/en/articles/2.14418.44450/ignition-lock-barrel-with-2-keys-pvduettaz-58-68-p ...my comments added!
------------------------
http://www.volvoforums.org.uk/showthread.php?t=217678
YouTube Video of Ignition Switch disassembly and internal inspection. https://www.youtube.com/watch?v=hfuUbguT9Gw

Frame capture from video showing the Gorilla Spring.
[...he does use some incorrect terminology like "tumbler" when he should be calling it "lock cylinder", and I prefer the term "detents" to "nubs", but I'll get over it...him posting this video means I don't have to... Things to note in the video are how Lock Cylinder is COMPLETELY SEALED from the Electrical Switch (so NO amount of lube we saturate the Lock Cylinder with will make its way to the Electrical Switch OR Gorilla Spring), and how his thumb is actually on the Gorilla Spring from about 1:35 on...at 1:50 he simply calls it a spring and breezes over it...finally, the posting is labeled 1969 1800, it is however applicable and representative of all earlier Volvos. '69 was actually the last year this style LC and key were used on the 1800. This was the change-over year when the factory went to 140 style LCs and keys.]
----------------------------------------------------
Additional Information:
Broken Vintage Volvo Ignition Key... immediate action and options.
Link to: Extracting a Broken Ignition Key
*The Lock Cylinder (LC) (PN ASSA 657291-1 or Nieman PN ????) is Removable for Replacement!
(Refer to picture below) To remove the LC, the Key is necessary. It should be inserted into the LC, and turned to the Ignition ON, Position 3 (see below!). The Retaining Button is then located behind the dashboard, protruding through the LC Retaining Hole in the ES housing collar, and depressed with a Pick tool or similar. This should cause LC with key to be pushed out, and allow simple extraction. If the spring which preloads into the tailpiece does not push the LC out at this point, a bit of additional wiggling of the Key should allow the LC assembly to be removed.

Nieman Lock Cylinder, showing two OE key styles available.
If LC needs to be removed because key has been broken off, it is likely already in the Ignition ON, Position 3. Disconnect Battery to prevent Ignition Coil overheating (see Note 1) and remove LC by depressing Retaining Pin.
“Drilling out the LC” is an extreme, violent act which some (strictly amateur!) Locksmiths might want to do as an easy option (for them!), but I recommend against. It is unlikely the vintage ES will survive this act completely unharmed! If the LC needs to be removed and a key is not available, this should be done by insisting that locksmith “pick the lock” to the Ignition ON Position (3) OR that the make a "Key by Impression" and use that to turn the LC to Position (3). Temporarily disconnect Battery during this work, to prevent Ignition Coil overheating - again...see Note 1, before depressing the Retention Button, and removing the LC.
Once LC is removed, ES can then be turned with a flat-blade screwdriver inserted into the slot which the Tailpiece normally turns, while organizing a replacement (see CVI info above, and Options 1-3 below!).
New Keys after Key Breakage:
Option 1. "Key by Impression", is an Locksmith's technique by which they use a new key blank to make a key when none is available (or as is the case for us, the key is in two pieces, in which case, they will probably recommend Option 2). The technique requires the LC be presented to them (which might pose a problem if it is still part of the car and hasn't been removed yet!), or them to be called to the location of the car (expensive road-call!). It also requires key fragment to first be removed, but Locksmiths have their tools and techniques for this.
Option 2. Extracting the broken key fragment from LC, and having the Locksmith use it, along with a new key blank, to cut a "new" replacement key. The operation is much like copying a whole key, except takes a bit more care on the part of the Locksmith.
Option 3. Getting two new keys when replacing the LC. Not nearly as much fun or creative as Options 1 or 2, and likely more expensive too...
Recommendation: Options 1-3 should be followed by the installation of a SW-EM Start Switch Upgrade Kit because the reader, (and most others of his species) has evolved to have opposable thumbs, walk upright, (and a few others have further evolved to drive a vintage Volvo), and is therefore intelligent, smart and capable of learning from past experience. Reference: Evolvolution
Note 1. Leaving Ignition ON with Engine not Running is not good practice! When Ignition Switch is in the Ignition ON Position 3, for the purpose of removing LC, but engine has not been started, Ignition Coil power node has power applied...the entire time! If Ignition Points, happen to also be closed at this time, it means Ignition Coil Primary current is flowing constantly and uninterrupted (compared to normal operation while engine is running). If this condition persists, Ignition Coil will overheat and can be damaged. Temporarily disconnect vehicle Battery to prevent this. A reminder of this is the orange OIL and red AMP Indicators are lit brightly for an extended time.
------------------------------------
Cyclic Cumulative
Fatigue: Cyclic or Cumulative Fatigue (in the Torsional (twisting) mode.
According to a popular on-line reference:
”Fatigue occurs when a
material is subjected to repeated loading and unloading.”…sound familiar?
A cute example of where we might
intentionally use Cyclic Cumulative Fatigue is if you collect pop-tops from
beverage cans for the charities. One will rarely liberate the pop-tops with the first
bend…the tab is intended to stay connected to the can (that’s the whole point of
why they were made “unremovable” in the seventies)…but after several more back
and forth cycles, with the metal becoming more weak at every cycle, the pop-top
finally beaks away…Cyclic Cumulative Fatigue has had the desired effect, and the
reader has just read another groovy practical analogy by yours truly!!
------------------------------------
Preventative
Measures to Prevent Key Breakage: Change
the rules(!), by making it so that the Ignition Key never has to be turned to
the very stressful momentary Starting Position 4 ever again! LINK A
SwEm Kit Pushbutton Start Switch
is available!
Additional Info:
Consideration of SwEm
Start Pushbutton particularly the interaction with an electronic
ignition module.
------------------------------------
Divide and Conquer. Having a watershed moment in troubleshooting, when one can definitely say it’s this or that is always handy, and here is one of those cases. Removing the * LC allows one to turn the key in the LC without any load on its Tailpiece. One can then easily see the high force to turn the key is not because of the LC resistance, but because of the Gorilla Spring in the Electrical Switch part...and one can also observe the gearing effect!
------------------------------------------------------------
Ignition Switch Positions and Function (including action of Gorilla Spring):
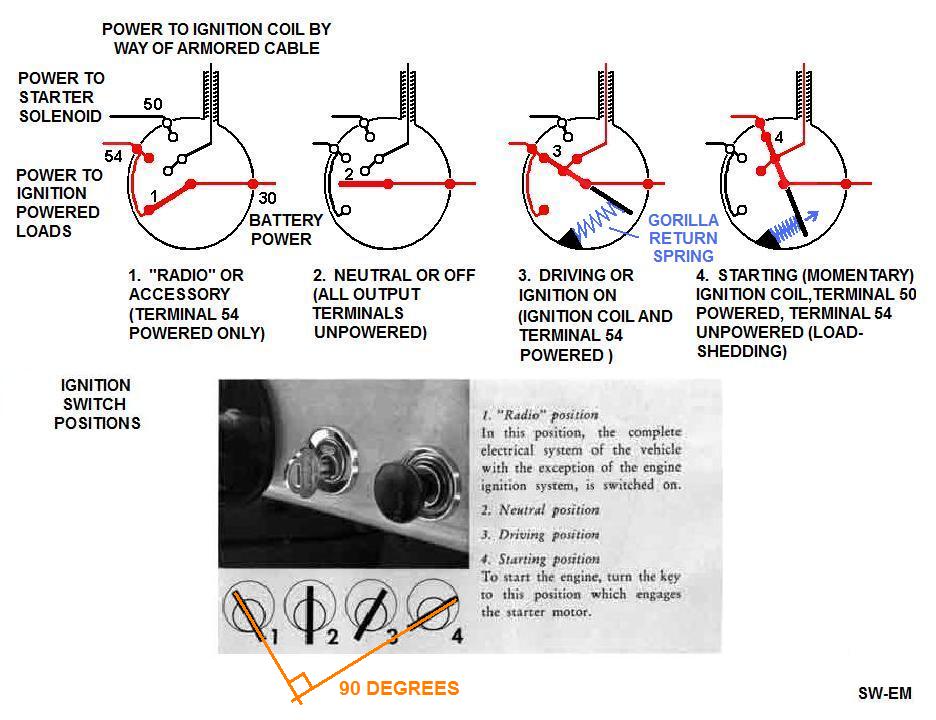
Swept angle of Key, between Pos1 and 4, is shown. This is consistent with
experimental measurements made in FIGURE 2 above.
------------------
Another, much rarer mode of Lock Cylinder failure:
My answer to a thread about Ign Key not turning to the Accessory (Pos 1):
These "...symptoms are of a (maybe) worn Lock Cylinder with (more likely) a copy of a copy of a copy "Key"...if you have your heart set on being able to use the Accessory position (and it would be nice to!), I wouldn't try to get it working while installed, where the poor key has to work against both the LC AND return force from Ign Sw!...I'd remove the LC from Ign Sw in the normal manner, lube it well with Triflow, and work the key in the LC until you tease it free...then work it some more...it should free up since key is working fine with pins in the CW direction, BUT if it remains gritty or sluggish, take it to a locksmith and have them make a better primary "key by impression", which should work a lot better...and have a first copy made of that key and use those keys as you retire the single key you have now, to a place of honor, before you break it!)...you know what I recommend for preventing that! ( https://www.sw-em.com/Broken%20Vintage%20Volvo%20Ignition... Operating a vintage Volvo with only one key and no Start Pushbutton is what I would consider HIGH RISK/LOW REWARD.
------------------
...from an E-mail on the subject: "Every time I send the car for repair/service it comes back with a broken key." ...this has happened to me also, not that I send my vehicle out for work by other parties a lot, but I was having a windshield replaced...one of the few jobs I leave to local auto glass shop experts.
For those that might at some point need to let someone else have occasion to start the car...like when the car has to be left with other people for service, I suggest temporarily sticking a big piece of tape next to the Ignition Switch with the words:
DO NOT TURN KEY TO MOMENTARY
START POSITION!
TO START, TURN IGNITION ON WITH
KEY, THEN PRESS START BUTTON!
...and before you leave "Your Baby" with them, you might want to point this out, plus the location of your Start Pushbutton...hopefully that will prevent disappointments!

Your Baby, at the shop!
-------------------
Late-Production Ignition Switch with integrated Steering Lock:
122:
Late Ignition Switch (fitted to the last Amazons from about '69) is not as susceptible to key fatigue as the early Ign Switch as it uses a different mechanism (NO gearing or Gorilla Spring) and a 140 style key. The later switch is identifiable in that it is located not in the dashboard, but on the Steering Column. This allows the Steering Lock feature to be incorporated.
Further details on 140 Ign Sw as seen below: Ignition Switch 140 Notes
Note: This configuration of Amazon does not have the Armored Cable supplying Ign Power to Ign Coil! Since the anti-theft provision (required!) of this ignition arrangement employs a steering wheel lock instead, it does not use the armored ign positive cable, and a third (the +) terminal will be apparent when inspecting Ign Coil, where normally we see only the High-Voltage output and Points terminals! The Ignition therefore CAN BE "Hot-Wired" is this configuration, but as steering column is locked without Ign Key, it would still be impossible to drive the car away. Reference: Volvo Ignition from Scratch.htm#Vintage Volvo Ignition system and the Armored Cable
Pictures courtesy Simon, used with his kind permission.

Late-Production Ignition Switch with integral Steering Column Lock provision.

Late-Production Ignition Switch, Key position, terminal function and wiring
detail.
Note: Terminal 57a on this switch has power applied in the "Locked" position. This terminal and function is not present in the early Dashboard located switches.*
* Term 57a is used to power low power lamps of the "Standing Light" in Germany (and possibly other countries on the continent), while parked, to light corners and increase visibility of the car when parked protruding out onto narrow, dark streets. It could conceivably be used to power an alarm system.
An interesting issue came to light recently when reassembling a Dashboard. Although wires and their location had been recorded at time of disassembly, the (smaller of the two) Black wires (Lights Power) was wrongly reconnected to the 57a Terminal. Given that this Term only gets power when in the 0 - Locked Position, that meant the Lights could only be turned on, in this Key position...the author could not explain this action, because on the earlier Ignition Switch, there in no terminal which is powered only when Ignition is OFF. Again, once it was realized that it was a late Ignition Switch was in play, the answer and explanation became clear.
Link to Thread: Ignition Switch Wiring: http://www.volvoforums.org.uk/showthread.php?t=266985
See separate Tech Note collecting all information on this the Dual Ignition Switch Special Configurations for 122 and 1800 Models
-------------------------------------------------------------
Gallery of Damaged and Broken Ignition Keys:
[Owners are welcome to submit pix of their dead warrior Ign Keys (plus the associated story, of which I'm sure there are a few interesting ones!!)]
It takes some people longer than others to address the weakness of the never-ending-saga of the Ignition Key vs. the Gorilla Spring...this owner is now installing a SW-EM Start / Kill Switch kit in his 1800!
Phil Ciborowski picture used with his kind permission.

The Gorilla Spring abused Ign Key Collection of Phil C, with author's mark ups,
showing axial bending occurring
in the weakest area where the key leaves the LC (these keys were retired just in
the nick of time!!), and the final
result, likely resulting in some CSL (Colorful Shop Language).
Notice these were all the OEM steel keys!

My own Ign Key collection...consisting of OEM steel and also aftermarket brass
keys...which after figuring out the real cause and adding a Momentary Start
Switch, I thankfully haven't added to in a very long
time!
Another Ign Key bites the dust [unnecessarily!]...and a nice Nieman oe key too!

Pic by Sebkin C. (permission requested).
...another one is ready to bite the dust!

Nick T. pic posted with his kind permission.

Jack B's Key Collection (see his
feedback).
Here is the result of brute force...either by someone who should not be working on cars, but should seriously consider taking up a hobby which involves a shovel, or maybe result of actions by a car-thief (who should be hit in the head with a shovel!)...is the reader seeing a pattern here...?
Picture by Paul M. used with his kind permission.

This Ignition Switch has suffered some serious abuse...the reinforced ring of
Ign Sw which is supposed to capture the Lock Cylinder securing pin is
completely broken away, so I don't expect the LC to be able to stay in place at all.
[I have a pretty good idea of how such damage
could be caused, but since it deals with defeating the anti-theft security of a
vintage Volvo, the reader will understand if I keep this info to myself!],
About the only course of action is the replacement of the Ign Sw/Armored Cable/Ign
Coil Assy at this point. These assemblies are No Longer Available
new, so replacing with a used assy is about the only option. Thankfully, these
are quality, highly reliable Bosch supplied parts, so it is a somewhat low risk gamble to
procure a used assy.
------
Ignition Key breaks in new Replacement Lock Cylinder:


Even a new replacement LC can break a key...this is pretty unusual, but happened to this owner...Nils Bergman pix, shown with his kind permission. [I have obscured his key code!]
Excerpt from his e-mail:
"I have a '65 122S where the common issue of both keys snapping finally bit me. I bought a new assembly from IPD and after a VERY rough install (the retaining collar for the cylinder pin is heavily fatigued and malformed from a prior owner's meddling) I got the replacement installed, however, I was not able to keep the protective collar on as the set pin wouldn't fully engage with it.
Well, during the install of the brand new cylinder...one of the new keys snapped
in my hand. So, pulled it all out, got it (gently) in a vice and began picking
at things with tweezers, picks...whole 9-yards... got it out, got the cylinder
back in but I'm down to one key and just don't trust the setup. "
"during the install of the brand new cylinder...one of the new keys snapped in my hand" [That is highly unusual! Breaking a new Ign Key is not a fatigue issue, but suggests that great counter-force is at work against the key, so something is very wrong, possibly internal to the Ign Sw mechanism and needs to be located and corrected!! I'd recommend first checking and assuring that the excessive torque is not called for by the Ign Sw in its present damaged condition, because breaking a new key off in a new replacement LC is again, a very unusual situation! After correcting the root cause, is of course, a great time for a SW-EM Start Sw, and a copy or two of the remaining single Key(!)]
[Unfortunately, I have received no further feedback as to what the root cause of this unusual situation might have been.]
------
(Excerpt) from Jackson Ashcrafts
site from the vintage SAAB world, at:
https://drive.google.com/file/d/0B-dIzLQHJLMqbERMUTFKcnREOHc/view

-------------------------------------------------------------
Unless otherwise attributed, the information here is Copyright© 2015 - 2025, by R. Kwas. The terms Volvo, Bosch, CVI, ASSA, SAAB, IPD and Nieman are used for reference only. I have no affiliation with any of these companies, other than to try to keep their products working for me, and to help other enthusiasts try to do the same. The results presented here are from my own experience, and carefully considered opinion, and can be ridiculed, laughed at, used for your entertainment or worshipped...your call! As with any recipe, your results may vary, and you are responsible for your future and own knuckles.
You are welcome to use the information here in good health, and for your own non-commercial purposes, but if you reprint or otherwise republish this article, you must give credit to the author or link back to the SwEm site as the source. If you don’t, you’re just a lazy, scum sucking plagiarist, and the Boston Globe wants you! As always, if you can supply corrections, or additional objective information or experience, I will always consider it, and consider working it into the next revision of this article...along with likely the odd metaphor, practical analogy and possibly wise-a** comment.
