Headrest Upgrading Notes
First published Nov 2007 R. Kwas (updates ongoing)
-------------------------------------
History
Installing and/or
Retrofitting Headrests
Making your Seatbacks
öHeadrest-Readyö
Hands-on Experience
Adjusting Headrests
Links
Reference Information
Inside a Seatback
Headrests
Installed onto Rearseats
-------------------------------------
History: Headrests became standard
equipment on all cars in the sixties, in part, to support the head when
reclining seats are titled back, and in part to reduce the high forces the neck
may be allowed experience, as the head tilts back during rear-end collisions, or
on the secondary return movement in frontal crashes (causing ōwhiplashö). See:
Adjusting Headrests. Produced for more than a
decade, the Amazon and 1800 models spanned this time period, with early cars not
being equipped with them, intermediate production years not being equipped, but
the frames being öHeadrest-readyö to accept an optional installation kit, and
late models being equipped with them as standard equipment.
The
ōHeadrest-readyö cars produced in Æ67 (from Chassis No 279900 for the North
American market, see: Reference
Information), were delivered with receiver tubes in place on the internal
Seatback frame, but
no Headrests fitted. These receiver tubes allowed for a simple dealer option
installation without having to remove the seat upholstery, by just piercing the
vinyl covering the tubes (see Fig. 3 of Accessory Instruction Sheet shown
below), adding grommets to clean up the cut edge, and then inserting the downtubes
of Headrests into the receiver tubes in the seat. If you are lucky enough
to have one of these intermediate vehicles, and you decide on installing
Headrests, you will also be spared the additional work of removing the seat
upholstery to install the receiving tubes. It can be determined if these
tubes are present by carefully feeling around on the top surface of the Seatback
(where there is not much padding), in symmetrical locations about a foot apart.
On later Amazon models after about Æ68, the receiver tubes and Headrests were standard factory
equipment.

Volvo accessory kit PN XXXXX.
These Headrests are obviously a bit different style, with the tubes departing
from the side. I have not had one of these kits in my little fingers, but
if it would be helpful if someone who does have access to this style can measure
the distance between downtubes to verify it is also 11 5/8" (29.5cm).

Instruction sheet (No. 680164) which accompanied the factory kit
Installing and/or
Retrofitting Headrests: Three
options and an alternate are available to the installer...listed in order of
simplicity (not counting the Alternate).
Option 1: If you are lucky enough to have öHeadrest-Readyö Seatbacks, procure and install
original equipment Headrest kit PN XXXXXX as shown above, if you can get one of
these into your hands! Purchase a Lottery Ticket on the same day because you
should take advantage of being that lucky, and maybe you can get back part of
what the OE kit surely cost!
Option 2:
Short
of getting the entire kit, procure just the original equipment Headrests only,
like from a parts donor car. Check uncertain automotive tag-sale-purchases as
suitable for your vintage Volvo by verifying the critical 11 5/8" (29.5cm) dimension
between downtubes. Color mismatches can be ignored, corrected by
reupholstering, or fixed with spray-on öVinyl dyeö products available (Search
for: Spray-on Vinyl Die). A: Install these Headrests onto öHeadrest-readyö
Seatbacks,
if receiver tubes are present, or B: Install Headrests onto suitably modified
Seatbacks, if no receiver tubes are present. See:
Making your Seatbacks
öHeadrest-Readyö Removal of the Seatback upholstery will be necessary to have the tubes
installed by welding as shown below.
Construct and install your own Headrests per the drawing below.
A: Install onto öHeadrest-readyö, or B: Install onto suitably modified
Seatbacks. See: Making your
Seatbacks
öHeadrest-Readyö

The early style Headrest with 11 5/8" downtube spacing.
Option 3:
Construct and install your own Headrests per the drawing below. A: Install
onto öHeadrest-readyö, or B: Suitably modified Seatbacks. The drawing should help interested parties make
acceptable copies of the original.
Alternate:
Slip-over-the-top-of-Seatback-type Headrests are an effective and totally
non-invasive solution if you decide you must have Headrests, yet still have your
heart set on leaving your 122 in absolutely factory original, and unchanged
condition. I checked at a couple of suppliers, but couldnÆt find this style
offered anymore. If the reader can find a source, please drop us an e-mail so
that it can be included here.

Making your Seatbacks
öHeadrest-Readyö: If
you are lucky enough to be able to have receiving tubes in your Seatback frames
from the factory...great, if not, simple 1/2ö ID clearance tubes can be fitted
to the Seatback frame by welding as shown
on the factory instruction sheet..
Critical is the center to center dimension on the tubes at 11
5/8ö (29.5cm)...centered with respect to the Seatback obviously...unless you like to
drive around like those guys who look like they have a spinal problem.
Lumbar
support bands:
Since stripping the upholstery from the Seatback is required for this operation,
it is a very good idea to check the condition of the lumbar support bands at the
same time...these are somewhat protected inside the Seatback, but still
susceptible to turning into ōsheet pasta gone wrongö [Gordon H.] from age. The
Pirelli supplied material is still available [Placeholder
for source] for refurbishing the seats, and greasing the threads on the
internal adjustment rod is also recommended while there is access.
Update: As of Feb 2017, an all-metal Seatback Suspension Kit, similar
to the Seat Suspension Kit is available. See:
Seatback Suspension Kit
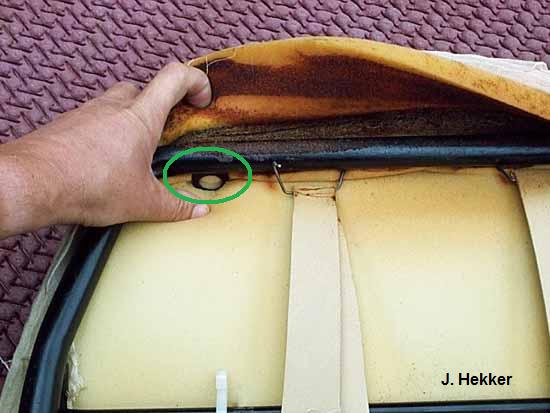
Removal of seat upholstery showing loop in Seatback frame (Green) which locates top of
receiver tube.
Also visible, more
"sheet pasta gone wrong"
Photo credit and thanks to Jim Hekker (http://www.volvoadventures.com)
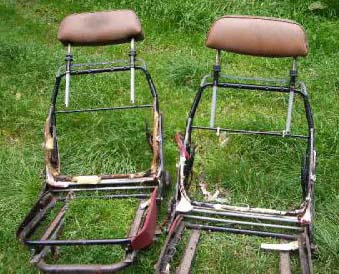
Wide spacing Headrests on
bare seatframes. Pic source: ?

140 Seatframe with narrow (7 7/8") Headrest spacing.
Pic source: http://www.brickboard.com/GALLERY/images/7877.jpg
Construction of Reproduction Headrests, suitable for vintage Volvos
with the standard 11 5/8" receiving tubes: The frame is based on standard
3/8ō
copper pipe, elbows and ōTö fittings, which are soldered into the dimensions
shown , and covered with foam. Firm, closed cell Urethane foam is used to
set the general shape. Cut the foam into a block of the correct dimensions,
then in half in order to allow the frame to reside in the fore/aft center.
After gluing the two halves onto the frame, in a clamshell manner (with
clearance
slots cut to accommodate the tubes...not too loose!), cover with soft 1/4 foam, and finally
upholster in the color of your choice...this is a relatively simple construction
project for any self-respecting, get-it-done-type, vintage Volvo rigger type
guy! From a crash safety standpoint, the (soft) copper is actually good in that
it will gently deform, absorbing impact energy, and it is much less likely to
break like the steel tubes, leaving sharp ends. If you can locate the
infinitely adjustable height-locks, great, if not, you may want to use the 1/2ö
ID heater hose trick (see below)!

Drawing for construction of reproduction Headrests.
Hands-on Experience:
The Seatbacks of the
Æ66 Snow Weasel did not have receiver tubes in place from the factory, so these
had to be retrofitted by welding into place after removing of the covering
upholstery.
I removed the upholstery and a local automotive shop did the actual welding.
Removing the upholstery is
not big fun, but it does beat doing the rear drum brakes (for the first time) in
a snowstorm! I used simple steel clearance tubes (sorry no pix available...this
all happened long before digital cameras made photo-documentation common, but
you should get the idea from the photo above
supplied of a more recent, and similar operation, by the kind and helpful Jim
Hekker
[http://www.volvoadventures.com/index.html
]...my
Greetings and Regards, to one of the biggest vintage Volvo fans around... in New
Zealand!...isnÆt the Internet fantastic?!.
Because the simplified receiver tubes which I added
had no height-clamp with which to lock the downtubes into place vertically, I
simply used 2ö lengths of 1/2ö ID heater hose over the downtubes, which sit on
the plastic receiver tube end caps (these were supplied by the automotive
upholstery shop), as a nonadjustable height spacer. These spacers fix the
vertical position above the Seatback. This solution is not nearly as elegant as
the original chrome plated downtube with the infinitely adjustable locks, but
nonetheless totally effective and still a neat looking installation. See:
Adjusting Headrests. Headrests themselves were from
a donor 140.
Picholder for Snow Weasel Headrests
Under those nice cozy sheepskins, the colors don't match,
but it doesn't really bother me!
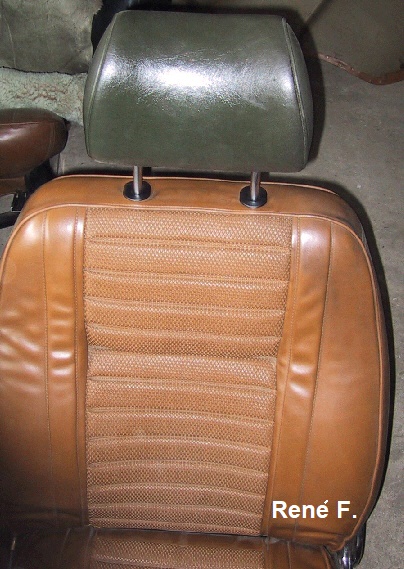
Here's another upgrade to Headrests with the later 7 7/8" downtube spacing,
before any color matching of the vinyl. Thanks to Renķ F. of the
Volvoniacs Forum for the picture.
-----------------------------------------------
Adjusting Headrests: For
Headrests to be most useful and offer the
best protection, they should be adjusted well. This means that they
should support the head and not allow it to tilt way back. I'm amazed how
many hits an gurgle search on "Headrest adjustment" turned up...only upwards
of 300,000!...it seems that everybody, from auto insurance companies to your
friendly neighborhood government safety nannies (the same
non-brainiacs who haven't yet felt it necessary to adjust bumper heights of
vehicles to standardize them) has information out there telling you how-to.
As far as I'm concerned, correct adjustment means setting them to a height where
the middle of Headrest contacts and supports the middle of my head when tilted
back (and I figured that all out without a two year $3,000,000 study!).
-----------------------------------------------
Links:
Used OE units from parts donor 122 or 140 vehicles are a popular. A survey of Brickboard owners
revealed, that the early 140 Headrests were similar also. Link to Thread:
http://www.brickboard.com/RWD/index.htm?id=1232978
Thread:
Retrofitting Headrests from an 1800... 120-130
http://www.brickboard.com/RWD/volvo/1299080/120-130/retrofitting_Headrests_1800.html
http://hem.bredband.net/b215872/amazon/downloads/Headrests%20in%20Volvo%20Amazon.pdf
Here is a nice documentation by
Gareth in Ireland from the British Forum:
http://www.volvoforums.org.uk/showthread.php?p=1150354#post1150354
-------------------------------------
Reference
Information:

Measurement of Headrest Tube OD.

Source: Excerpt from Exploded part diagrams. Note Chassis Numbers.
-------------
A closer look inside a Seatback:

Internal view of what a 122 Seatback with Headrest, might look like before
replacement of the suspension bands.
Note the complete lack of tension in the Lumbar Bands! These are giving NO
support whatsoever! This Seatback is a good candidate for suspension
replacement! See: SW-EM
Kits Seat Suspension Kits
One last peek, looking up the Seatback from the
bottom, before closing, after upgrading the suspension with an all-metal
replacement.
Chris Mardis picture, used with his kind permission.

Albert Schouttetens picture, used with his kind permission, showing more
"sheet pasta gone wrong".
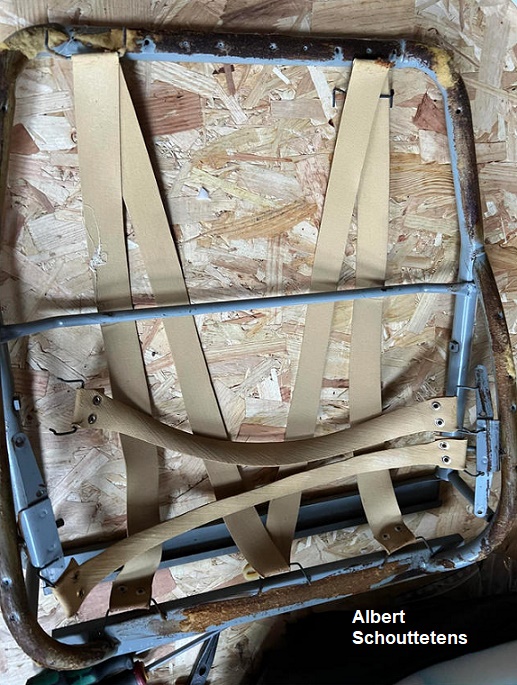
Lumbar support...what lumbar support??
This must be an early Seatframe...no downtubes or upper member are present.
-------------
Headrests
Installed onto Rearseats:
Here is a very nice retrofit installation onto an Amazon
Rearseat. See full thread at the Volvoniacs Forum:
http://www.networksvolvoniacs.org/index.php/Spezial:AWCforum/st/id5586/Amazon_Kopfst%C3%BCtzen_hinten.html
Christian W pictures reposted with his kind permission.


Christian has also retrofitted Threepoint Seatbelts into his Rearseat.
-------------------------------------
Sources of external materials are attributed. Otherwise,
this page is Copyright ® 2007-2022, Ronald Kwas. The terms Volvo and
Pirelli are used for reference only. I have no affiliation with either
company, other than to try to keep their products working for me, and to help
other enthusiasts to do the same (although there is little chance of preventing
"Sheet Pasta gone Wrong"...it just kinda happens with time!).
The results and highly opinionated thoughts
presented here are from my own experience, and carefully considered
opinion, and should be used in conjunction
with normal, careful shop practice, or can be ridiculed and laughed at, or
worshipped, at your
discretion. Remember, you
alone are in control of your knuckles,
and future!
As always, if you can supply
additional info to help fill in the blanks, or objective experience, IÆd
appreciate hearing it, and will consider working it in to the next rewrite of
this article...along quite possibly with the odd wise-a** comment, if I can
possibly work it in. You are
welcome to use the information here in good health, and for your own
noncommercial purposes, but if you reprint or otherwise republish this article,
you must give credit to the author or link back to the SwEm site as the source.
If you donÆt, youÆre just a lazy, scum sucking plagiarist...and
the Boston Globe wants you!
