Wiper Arm and Blades Notes
First published Mar 2017 (changes on-going)
[Comments Added]
---------------------------
Removing Wiper Arm
Installing Wiper Arm
Drive Bushings are an
Interference Fit!
Mechanical play in the Wipers
Reference Information
Link to a related SW-EM Tech Article:
Wiper Parking
Side
Notes (or, Right is Right, for LHD, and Left is Left, for RHD!)
---------------------------
Removing Wiper Arm: Wiper Arm is connected to Wiper Driveshaft, which comes through
cowling under the Windshield, by way of a splined joint at the Drive Bushing
of
soft
whitemetal. At some
point, it may become necessary to remove or replace the Wiper Arm. This must be done
carefully.
Inexpensive Wiper Arm Removal Tools are available, which hook under the lip of
the attachment cup, to allow a simple one-handed removal of the arm. These
also prevent the cup from snapping away when released from the drive-post.
If a removal tool is not available, below shows the alternate removal of Wiper Arm
using a flatblade screwdriver as a lever...this will
lever the Cup of the Arm off the Drive Bushing. Proceed GENTLY! Hook end of screwdriver blade under Wiper Arm
Cup only
and not Drive Bushing also...purpose is to pry Cup off Drive Bushing, not Drive Bushing
from Driveshaft!!
Because of the big Tension Spring, which also serves to press the
Wiper Blade onto the glass, Cup will tend to get pulled and rotate toward the Arm as
it is pulled by the beefy spring, as shown here (3). Mechanic should be aware and ready for this!!

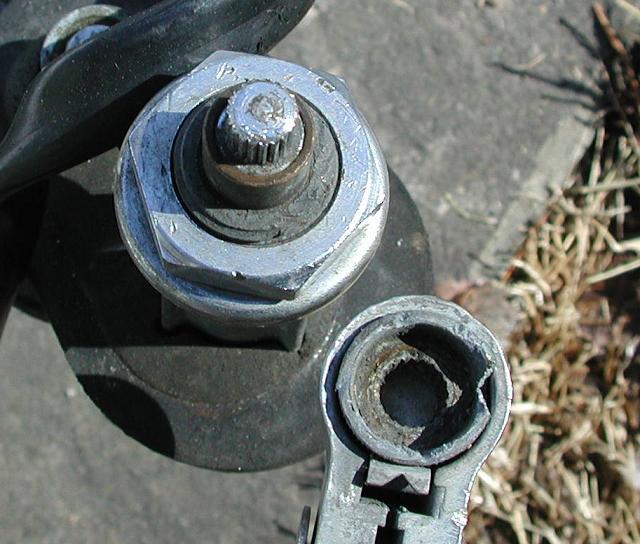
Wiper Arm Removal Options. If a "Removal Tool" is not available, GENTLY(!) remove Wiper Arm with a lever,
and lift the Wiper Arm off the splined Bushing. The Retaining
Spring
(orange) is easily overcome to
allow this . Paintwork is protected and a
strategically sized Fulcrum Block is used.
Unfortunately also, if Bushing to Driveshaft connection has been
weakened by any mechanical insults (such as not freeing the Wiper Arm from being
frozen in-place in the winter) or anything of the sort which might make it
weaker than Bushing to Arm connection, the Bushing might release from the
Driveshaft...then it looks like the picture below! That is why one must
proceed gently with this and any other removal technique!
Unsuccessful removal of Wiper Arm...Drive Bushing has separated from Drive shaft instead of
Arm...at 3O'Clock Drive Bushing looks like it has endured some mechanical
insult. Drive Bushing needs replacement!
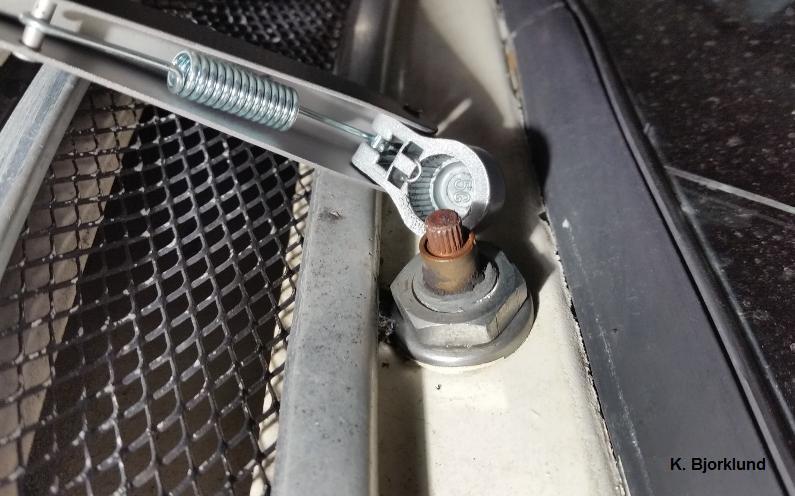
From Facebook ("Volvo 122" Group) Posting...the white-metal Drive Bushing which
is pressed onto the small (rusted) splined Wiper-Driveshaft, is missing in this
picture. The larger internally splined
hole in the Wiper Arm base cannot be installed until this Bushing is present
(and solidly connected to the driveshaft!). Only with a solid connection
between the driveshaft and Wiper Arm can high forces be transferred. If
not connected well, it wouldn't be the first time these high forces caused a
Wiper Arm to become disconnected and lost on the side of the road...in a
rainstorm...not so good!
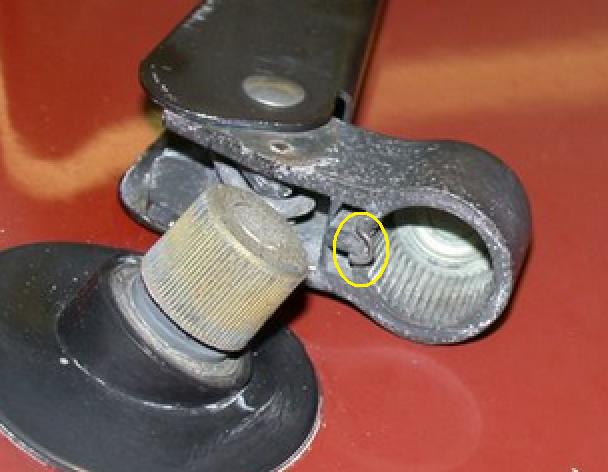
Wiper Arm Drive Bushing details, also showing two different style Retaining Springs
on the Wiper Arm Cup...these don't do much in the way of keeping the Arm on
Bushing...with the forces applied to the Arm by the motor, if splined connection
is loose and Arm wants to become disconnected, it will...then, one may find
themselves looking for the Wiper Arm at the side, or middle of the road...in the
rain...DON'T GET RUN OVER BY TRAFFIC!
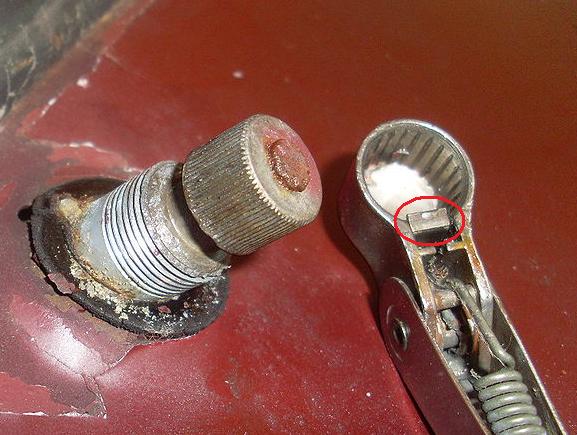
Installing Wiper Arm: Variations in the splining of the Wiper Arm
Cup in Arms from various manufacturers can also be seen in the two pictures
above...typically, there are more splines on the Drive Bushing than Cup, so this
allows installer some angular options in the Park Position, when installing a Wiper Arm back onto the
Drive Bushing. Technique should be to hold the Arm at the preferred
Parking position angle on Windshield, then fold the Cup open against the beefy
spring (if the "Removal Tool" is not already doing that) to align it with Drive
Bushing, and vary the angular position until the nearest mating point/(spline) is found,
then pressing the Cup home onto the Bushing with authority...a couple of
measured, gentle taps would not be out of place to take up any slop in an
old, worn spline joint

Currently available replacement Drive Bushing, which certainly looks like
brass...installed with a hammer...the external Splines on the Driveshaft cut into the
soft brass...I don't like the hammer part so much, but it looks like installer
was successful here (a helper backing the shaft under Dashboard up with a
counter-mass against the Hammer impacts, is a very good idea, and recommended!)...a drop of Loktite to wick into and fill any spaces between
the two to further secure the connection might
be a good idea too...
Drive Bushings are an
Interference Fit!
Preferred intallation method for Drive Bushing is by pressing on the Bushing
with high force but in a controlled manner! (Note two sizes of Bushings
were fitted, so it's important to measure and procure the appropriated
replacement size...Autolite
(early) with a 6mm driveshaft and Electrolux (late) Drive shaft with an 8mm
driveshaft...measure before ordering to prevent
dissapointments!). Ideally, the Drive Bushing should be pressed onto the
splined Driveshaft with high force and in a controlled manner. This can
easily be acheived when the Assembly is removed from the vehicle, as seen here.
J Graham Coutts picture used with his kind permission.
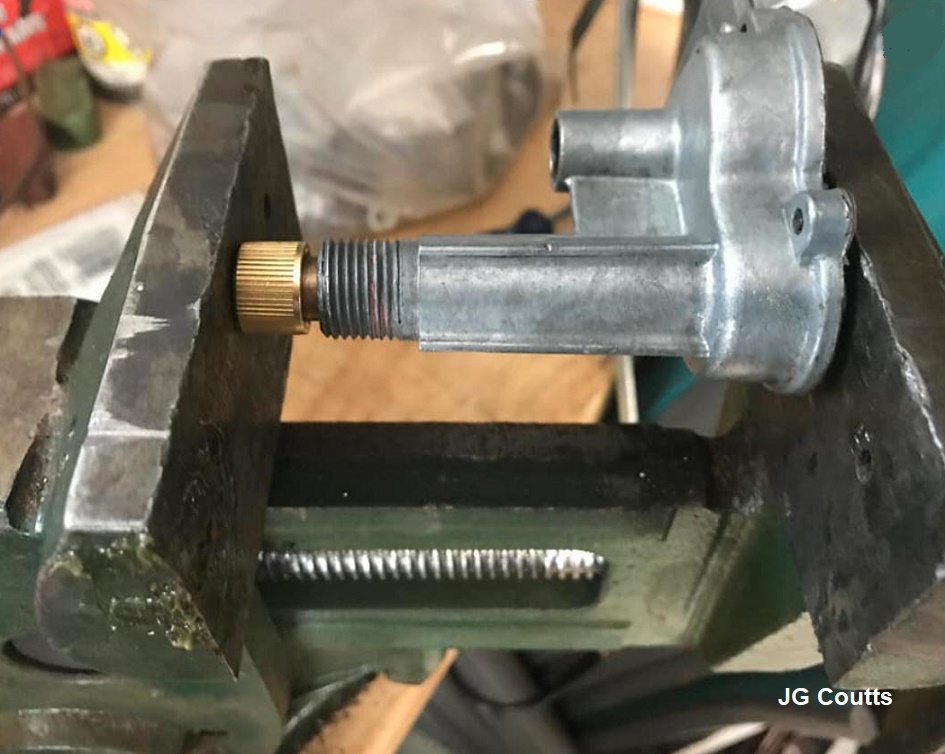
Wiper Dive Bushing being pressed onto Driveshaft in a vice and in a slow, controlled
manner.
If a Drive Bushing must be installed with the assembly remaining installed in
the car, it can be done with impact force from a hammer, but the back of
assembly MUST be well-supported with a mass to counter the impact force, so that
force goes into seating the Bushing, and not also damaging other things!
The process is therefore a two-man job, with the helper supporting the back of
Wiper Drive Assembly (either Gearbox or Cable-on-Cam) with a mass such as a
hammer handle, an the repairer squarely aligns and locates the Bushing, and
applies measured taps with a second hammer to seat it. Again, the Bushing
is a interference fit with the Driveshaft, so it might seem as though the
Bushing ID is initially undersized...the following tip is a machinists trick to
help...
Tip to help with installing one of these replacement brass Drive Bushings, which can be difficult and stubborn since they have a plain, undersized ID
surface when new, and are an interference fit! [I have seen the term "miserable" used...]:
Installation tip on
 by
Mike P: "Tap it on to give you marks, then file the grooves by hand."
by
Mike P: "Tap it on to give you marks, then file the grooves by hand."
My response to this tip:
"This is a brilliant Tip! New replacement bushings
have a plain, ID which will be bear to install without this trick (even when
supporting the Wiper Driveshaft from below so it can be pounded on with impacts
from a hammer)! ...but adding the grooves based on witness marks will greatly
help!
I give you high points for this Tip!"
My response to another
installer who questioned the replacement Bushing being the right part, because
there were no internal splines:
"Replacement Bushings do not have splined ID because they are sized to be an INTERFERENCE FIT, and so intended to be
pressed-on with a fair level of force...so you MUST support the shaft well from
below when doing this...and you can use hammer impacts...but depending on the
amount of interference, you may feel this may be more force than you want to
use...so a trick is to just put bushing on lightly and tap it enough to get
witness marks from splines, then remove it and file SLIGHT but accurate splines
into (at least some) of the ID at the witness marks to reduce the interference a
bit (not too much, it MUST still be an interference fit!), to help with final
installation...I would say file, then trial-fit (leaving SOME interference!),
then file some more, and trial-fit...this is a tricky process which should be
repeated until you are satisfied you can finally force the bushing on with good
contact (if I was replacing a Bushing, I would use this method, and for final
installation, apply an
anaerobic threadlocker to take up space between shaft and
bushing, and permanently "seal and glue" it on, as I tapped it home, well
supported from below!) ...don't forget, this bushing transfers fairly high
forces in service! Please post pix of your results and comments! Good Hunting"
My comments to JGC's
posting of the picture above:
"I totally agree with JGC...gently pressing
on the Drive Bushing outside the vehicle with highly controlled force is MUCH
Preferred to hammering, which is an
imprecise, only semi-controllable, possibly damaging method...combine that with
the imprecise Interference Fit of a new Bushing, and I can see why you might
[another poster's] use the term
"suck"...but if circumstances are such that a replacement Bushing must be fitted
while assembly is still mounted in the car, getting some witness marks from a
trial insertion, then gently filing some "starter-slots" at those witness marks,
then proceeding with CAREFUL hammering it on (while a helper backs up the
mechanism with a mass, like another hammer handle) can be a BIG help and lead to
success...! Cheers"
------
Link to Reference Information,
Wiper Drivebushng Dimensions
------
Other Creative and Non-Original Repairs:
A somewhat rustic "setscrew repair" undertaken after an Arm was
lost...I saw this in my surfing around the net...it looks like it would work,
but I don't like it so much
as it is pretty ugly, and it seems that it would significantly weaken the small Driveshaft
below Bushing as the size of the setscrews is approaching the diameter of the splined
shaft.
The author came up with this solution some years ago, for keeping the Anco
Standard Replacement Arm (See info on this below) firmly attached to Wiper Drive Shaft, which is arguably less rustic and
(slightly) less ugly than the one above (...so says he!)...
A very carefully hand-drilled and tapped arrangement with a SS 6-32 screw installed keeps
the Driveshaft and Wiper Arm positively united:
This is a workable repair which leaves all splining of the Driveshaft intact,
unweakened, and able to transmit the operating torque, but not recommended for the faint of heart...if the drillbit was not down the
center or Tap were to
break during the operation, it would render the assembly into scrap, and
increase the scope of the repair project, and number of expletives uttered, a lot....
-------------------------------------
Links:
Wiper Arm/Post
Repair
SW-EM Tech
Article: Windshield Wiper Systems
-------------------------------------
Reference Information:
https://en.wikipedia.org/wiki/White_metal
Anco No. 41-01 Original Equipment
style Standard Wiper
Replacement Arm. This is not a specific endorsement, but the author has
found quality to be good, cost to be reasonable and it to work satisfactorily. Other Manufacturers probably produce
similar parts:

I have found the this part works well on the 122 and 1800 application when
paired with 11 inch wiper Blades for the 122 or 13 inch Blades on the 1800.
Note that Blade angle with respect to Arm is adjustable (A), and that included is a
Drive Bushing where mating hole is off-center, which allows a setscrew securing arrangement (B). This might be just the
thing for a damaged Drive Shaft!
-----------
Wiper
Drivebushing Dimensions:
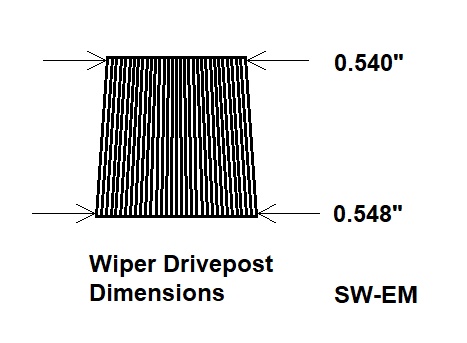
OD of Driveposts are slightly conical by my measurement!
Don't forget...Drive
Bushingare an Interference Fit! ...see above!
-----------
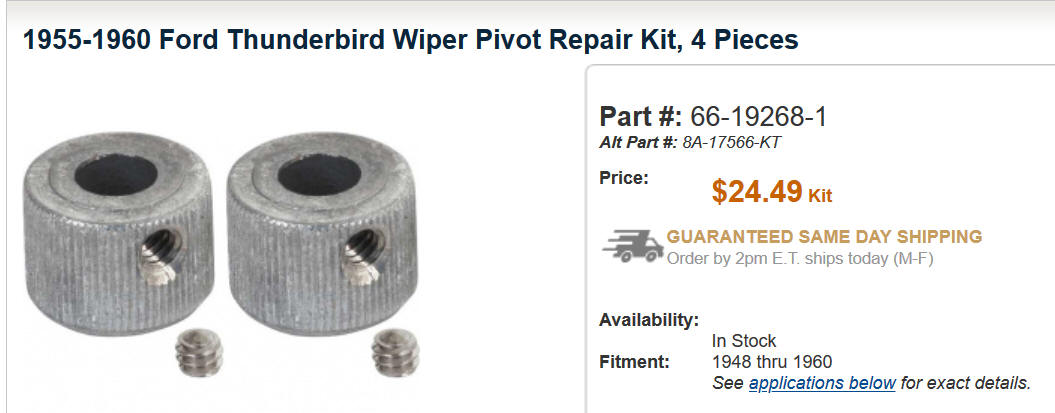
Drive Bushings with a set-screw are a great solution if splines
on drive-shaft are damaged or there is an issue with the Interference Fit! This damage is rare, as the Bushing is typically of
softer material, but in some cases may be a good repair option!
Source:
https://www.macsautoparts.com/ford_thunderbird/ford-thunderbird-wiper-pivot-repair-kit-4-pieces-1955-60.html?fbclid=IwAR1nDiZrMn5erFbwbVxNMjrNXRWvGHrepoTimvCskkR84tfBW0o7oUnUPFk#
[I have no relationship with this outfit
other than to make others aware of its existance!]
-----------
Another Drive Bushing Option I ran across...this bushing
seems to have more options, which might prove handy when dealing with a damaged
Driveshaft:
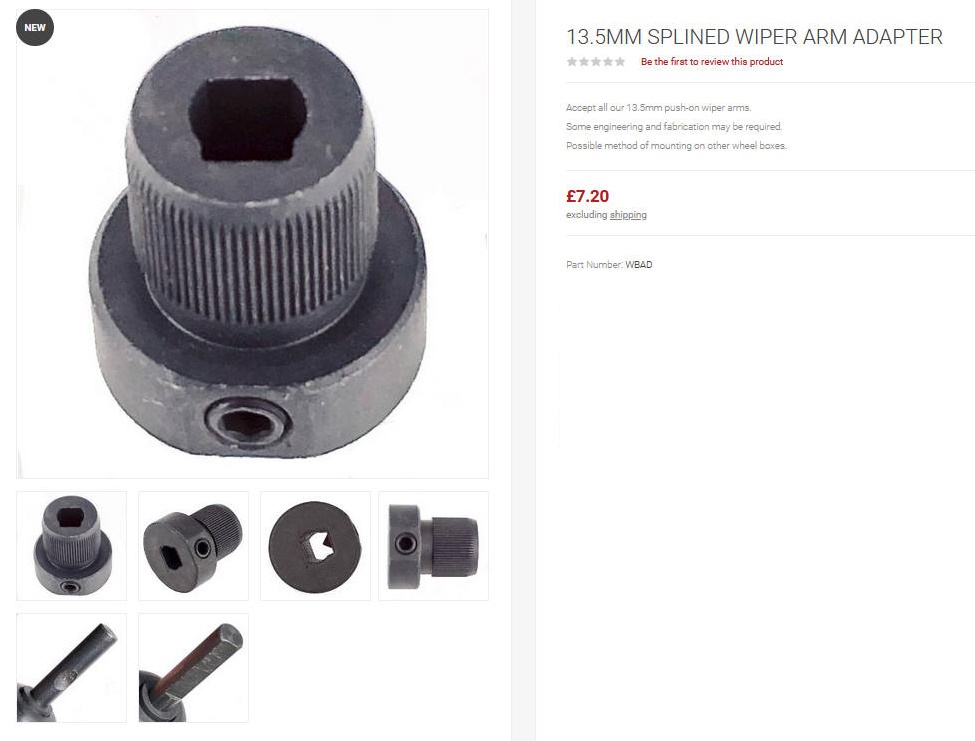
Source: Carbuilder.com/uk
Link
-----------
Mechanical play in the Wipers
Slop or lost-motion in Wiper Blades can develop as the mechanism
wear in general, but as a rule, the square, swagged Drivepost to linkage
connection should not, this suggests Wipers were heavily loaded, or even locked
in-place (by ice). Below are two examples of the damage which can be cause by
locked Wiperblades...the first on a 122 Gearbox drive, and the second on an 1800
Cable-on-Cam drive.
122 Gearbox type Wiper Drive Mechanism with damage:
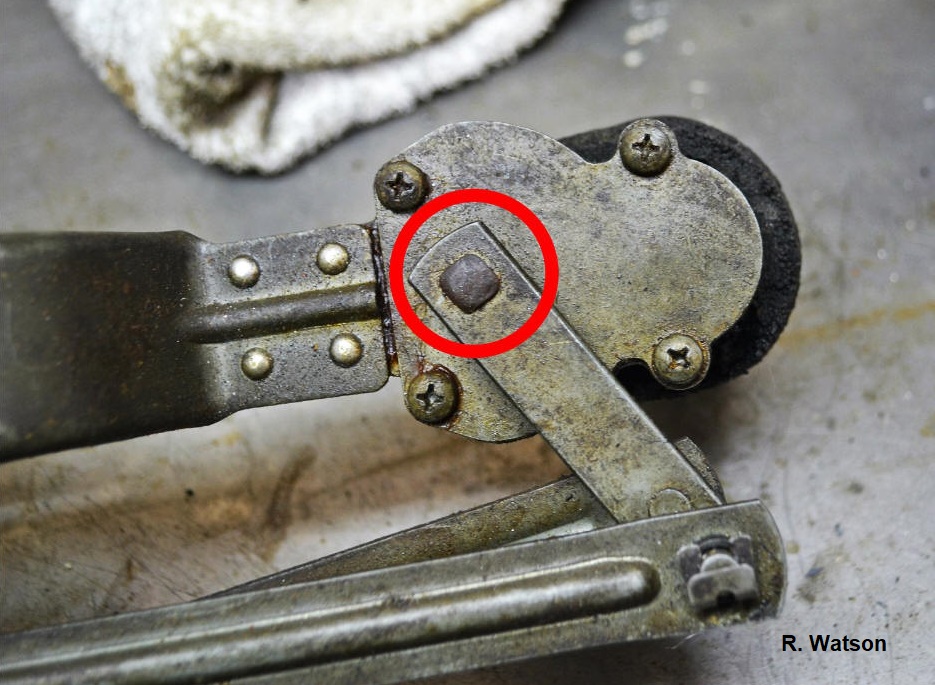
The Gearbox type drive is not immune from damage by
a frozen Wiper Blade, or even just moving large amounts of heavy snow and
long-term wear.
Here the Segment Gear Shaft has worn slop into the square drive linkage hole.
To prevent this kind of damage, it's quite important assure Windshield Wipers
are not bound by ice or anything else, and free to operate! If this sort
of damage occurs, author recommends TIG welding across the gap of displaced
metal. since fixturing the assembly to redo the peened and displaced metal of
the original is beyond to shop possibilities of a casual mechanic, especially
with the assembly attached to the Gearbox.
Picture credit: R. Watson and used with his kind permission.
1800
Wiper Linkage Repairs [copied from
SW-EM Service Notes Page, Body]
[From E-mail response to Oliver B. regarding "play
in the 1800 wiper system".
I suggest you try to figure out just exactly what the problem is with your cable wiper system...I
don't actually think either system [122 gear type, 1800 cable type] has any particular inherent weaknesses other than wear induced slop after they've made about a million or so
wipes...and can you blame them at that point? (And I doubt the gear type is much better at that point either!) I have noticed
that the double "D" shaped shaft of the cable type going into the pulley overpowers the matching hole in the pulley and
develops a fair amount of slop...this is in fact the situation on my '66 1800...this does seem to be a weak link, but I plan to
have the shaft (carefully) TIG welded onto the pulley (instead of replacing the whole mechanism) whenever I get to
removing the assembly...as you know, I'll be putting that off for as long as I can!!!...in fact, that is one reason I came up with
the intermittent wiper controls for the different vehicles (see SwEm kits)...it further minimizes the rate at which the wiper
system mechanics wear. I suggest you consider this same welding fix, if the worn double "D" hole condition exists on your
car.

1800 Cable wiper linkage showing
square drive double
"D" shaft and distorted hole in pulley (Photoshopped in - I didn't
feel like crawling under the dash of my 1800 for a real pic, so I went the lazy
route...)
------------------------------
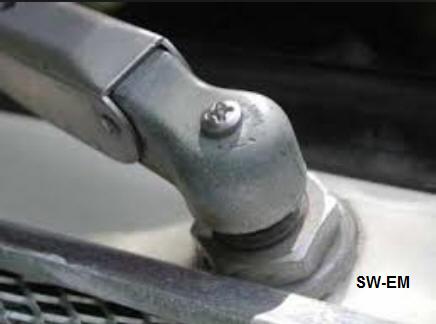
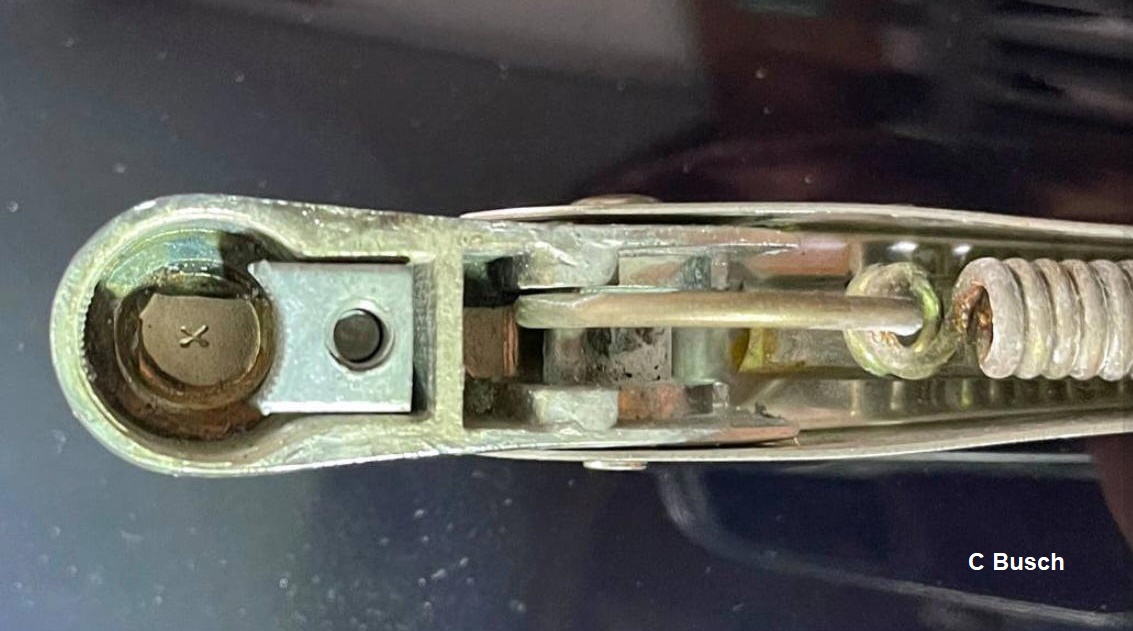
Alternate Wiper Arm to Drive Post Securing:
Volvo did not manufacture Wiper Arms, but fitted
assemblies from manufacturers who specialized in producing them. Here is
another style which was encountered.
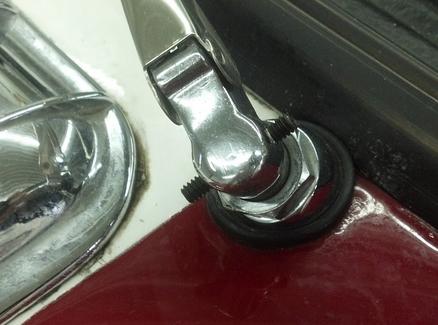
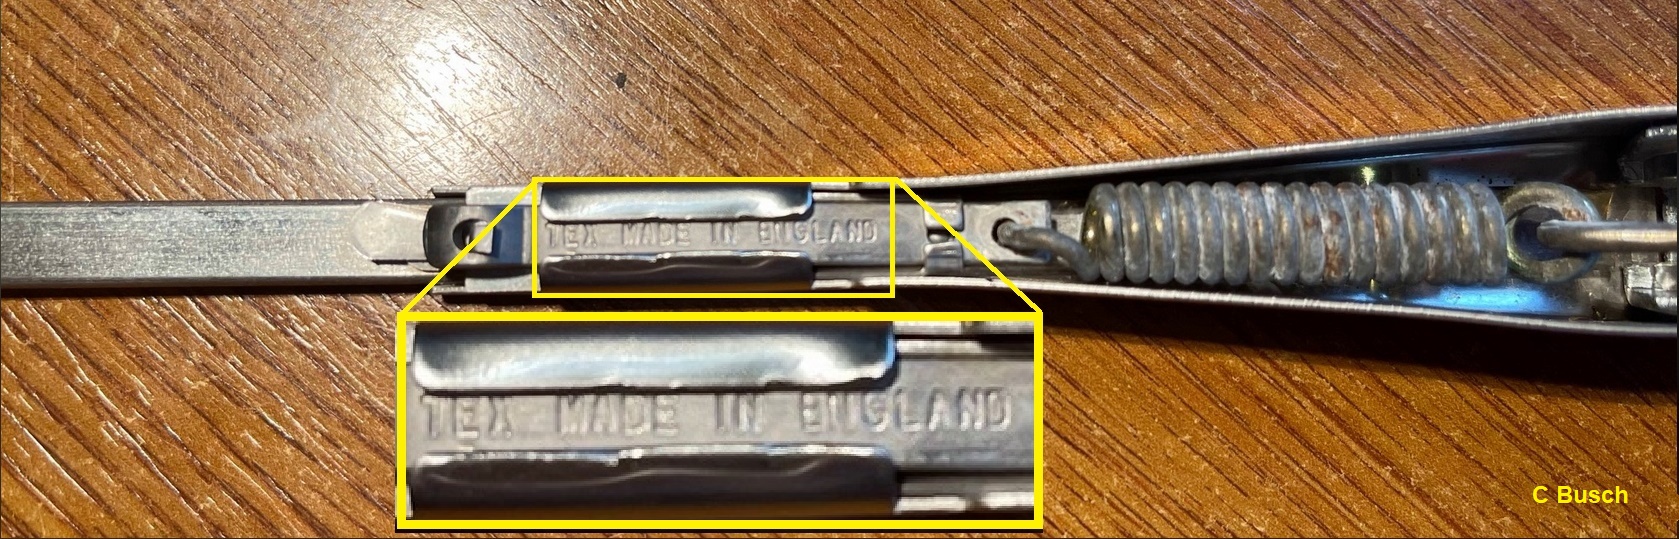
Constant Busch in Britain recently showed this Wiper Arm
in a FP post. Notice the
Philips head screw, not protruding into the Wiper Drives Post, but a look
underneath shows it is still securing the Arm, by way of what the manufacturer
calls a "wedge lock".
Pictures by Constant Bush and reposted with his kind
permission.

Question: What does the Philips flathead screw
go into?
...it's certainly not going into the Drive shaft like my groovy solution shown
above!
Answer: Into a threaded plate which clamps onto the Drive Post!
A request for manufacturer's info shows this Wiper Arm is Made in
England, by the company Tex...they have web presence and Arms are still
available. This looks like a good option for a loose Drive bushing!
"Tex" British Manufacturer:
https://www.motoringclassics.co.uk/classic-car-parts/wiper-arms?fbclid=IwAR3o0964nhdj4oZfg7BCqk_QtNhVhpEdnm61gRMUUUf-mswcPWF3A2QiGXQ
From the Tex Product Details: "The TEX patented Wedge Lock design allows
replacement wiper arms to be fitted to worn wiper drive bosses which would
otherwise be unsuitable for push-on heads."
[This design looks effective!]
------------------------------
Scratched Windshield:
My response to a FP
posting of what
to do about a heavily scratched Windshield:
" What that [Windshield
polishing] outfit is telling/selling notwithstanding (and I
invite them so prove me wrong!), only the slightest scratches and
pits can be removed...so with a major arc-scratch from contact of
the Bladeframe with glass, it's most probably time for a Windshield
(and Gasket!) replacement (inspect and correct gasket seating area
for rust!).
That makes the point about never running the Wipers dry, and NEVER,
EVER, EVER letting the Blades deteriorate to a point that the
Bladeframe touches the glass! May "Shame and the Wrath of Odin" be
upon the slacker individual who allowed that!
If a Blade deteriorated like that on the road, and I needed the
Wiper, I would rather pull that Wiperarm off, than allow
contact...and if it was the drivers side, I'd swap the Blade over
from the Pass side...yep, that's what I'd do! "
-------------------------------------
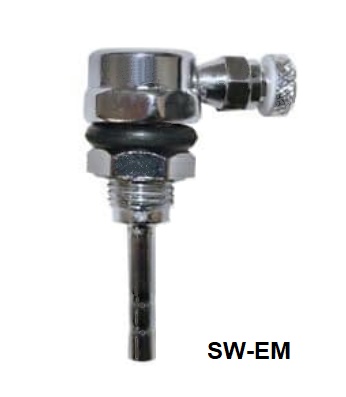
Windshield Washer Nozzles:
Trico supplied Washer Post showing a single Nozzle. Some configurations
had one centrally located on the hood with two Nozzles, the 544s (and some early
122s) had two separate
posts with single Nozzles, next to the Wiper Posts.
-------------------------------------
External material
attributed. This information is
Copyright © 2017-2024. Ronald
Kwas. The term Volvo, Anco, Trico and Tex are used for reference only. I have no affiliation with
any of these companies, other than to try to keep
their products working for me, help
other enthusiasts do the same, and also present my highly opinionated results of
the use of their products here. The information presented comes from my own
experience and carefully considered opinion, and can be used (or not!), or
ridiculed and laughed at, or sent to Sweden to your uncle Olaf for review, at the readers discretion. As with any recipe, your
results may vary, and you are, and will always be, in charge of your own
knuckles, and future!
You are welcome to use the
information here in good health, and for your own non-commercial purposes, but
if you reprint or otherwise republish this article, you must give credit to the
author or link back to the SwEm site as the source. If you don’t, you’re just a
lazy, scum sucking plagiarist, and the Boston Globe wants you! As always, if
you can supply corrections, or additional objective information or experience, I
will always consider it, and consider working it into the next revision of this
article...along with likely the odd metaphor and probably wise-a** comment.
