Defeating one side of the two-sided Spring-Clip with a thin tool while lifting the Surround.
Water on the Floor, Notes
Dec 2019 R. Kwas, Revision ongoing,
[Comments added]
---------------------------
Leaks of fluids from/in a vehicle are seldomly a good thing, but when they occur inside the passenger compartment, and anoint the floor with liquid, the situation calls for some immediate attention!
Source of the leak should be determined first, and this will determine the urgency which which repairs might be necessary...at the low end of the urgency scale would be:
1. ...leaks of Rain/Washing Water making its way past window seals (including possibly Windshield), which are not working their best any more.
PLACEHOLDER FOR
WINDSHIELD AND VENT SEALING NOTES
2. Rainwater/Washing Water which has made its way into the fresh-air intake cowl in front of Windshield, and is somehow making it onto the cabin floor rather than being allowed to drain harmlessly away by way of multiple paths available to it. I've tried to cover body differences between the svelte and sporty 1800, and Amazon:
1800 Fresh Air Vents
including Removal of the Cowl-Grill.
Amazon:
Rainwater Leaks by way of the 122 Airbox / Heater Core Enclosure
3. ...and finally third (with a possibly higher sense of urgency): Colored Water/Coolant, which has come from either the Airbox / Heater Core Enclosure (suggesting a Heater Core Leak) OR and incontinent Heater Control Valve.
------------------
PLACEHOLDER FOR WINDSHIELD AND OTHER GLASS SEALING AND WATERPROOFING
------------------
The 1800 Fresh Air Vents and the cowl depression in front of the Windshield, are sometimes the source of water in the footwell:
The first line of defense is inspecting the "Debris-Tub" by looking through the Fresh-Air Cowl-Grill, to assure it is not filled with debris [make that the second line of defense...the first being that fine mesh Grill]. If it is anything but clear, or the plastic tub is even missing allowing debris directly into the Cowl Depression below, the debris can also clog the Drains, allowing the water level in the Depression to rise until it overflows the Fresh-Air Vents on either side. There is nothing wrong with this design, IF "Debris-Tub" is occasionally checked and kept clean and free of debris.
Once the Grill has been removed, also remove Debris-Tub, and clean this. Inspect the Cowl depression below it and clean this area also. A shop-vacuum with extension will work well here. Also, check and clean the access port to the Heater Core, forward of the Fresh-Air Cowl Depression. Be careful not to damage the fragile fins of the Heater Core with the shop-vac attachment.
Once the Cowl area is clean of debris, inspect the depression. There may be fine dirt, debris, and biomass that have made their way into the Cowl Depression past the fine grill and Debris-Tub, and some of these can coagulate and clog the drains, allowing the level to build up the half inch or so, until it overflows the Fresh-Air Vent Seals and flows into the passenger compartment... It's important to assure is that the (2) Drains are clear to do their job. The Fresh-Air Cowl Grill does not even need to be removed for this...a simple flexible wire inserted from below, into the Draintube outlets at the rear of engine compartment, below the Heaterbox can assure a clear path, but if this wire runs into a blockage, or it has been a looong time since the Grill has been cleaned, a first-hand look might be best!
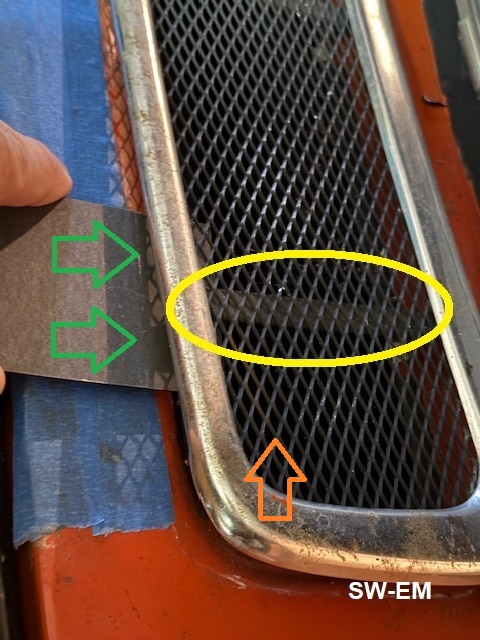
Spring-clips (6 total), secure the Surround with Grill, into the cowl opening. Removal need not be daunting, but it must be done carefully to avoid collateral damage to paintwork or the soft aluminum Surround itself. Defeating the force of the Spring-clips can simply be accomplished with a flat putty-knife or similar tool, which has been taped to prevent it from scratching the finish, then sneaking this tool beneath the Surround (three Clips in front, three in back!) in the area of one front side Spring-Clips, and levering [...more accurately: Pushing the Clips away from the body and towards the opening, so they stop holding down the Surround.], while gently also lifting the Surround. AVOID PUTTING EXCESSIVE FORCE ON THE SURROUND! It might take also going onto the middle-front Spring-Clip if the Surround does not release immediately, while adding a shim as a lifting support to the previously lifted Clip area. Do not force the process! The soft aluminum Grill-Surround can easily be bent into a pretzel, from which it cannot easily return!!
Alternately to the taped putty knife, the body along the front of Cowl-Surround and Grill has been taped for protection. A piece of thin, flat, stiff resin filled board ("Fish-Paper"), is pictured here, being slipped under the Cowl-Surround in the area of the near-side, front Retention Clips, and used to gently push them away from the Cowl-opening edge, while lifting up to defeat them. As progress is made, the shim can be moved to the center Clip to continue the progress, and finally to the far clip. REPEATING: DO NOT BEND OR DEFORM THE GRILL-SURROUND!
Defeating one side of the two-sided
Spring-Clip with a thin tool
while lifting the Surround.
When the last Retention-Clip finally releases the Surround with Grill so that it can be removed, the Plastic Debris-Catch Tub is evident. It is empty in this case...that's good and preferred, but if filled with bio-debris which has been sifted through the fine mesh grill, it can simply be lifted out and emptied.
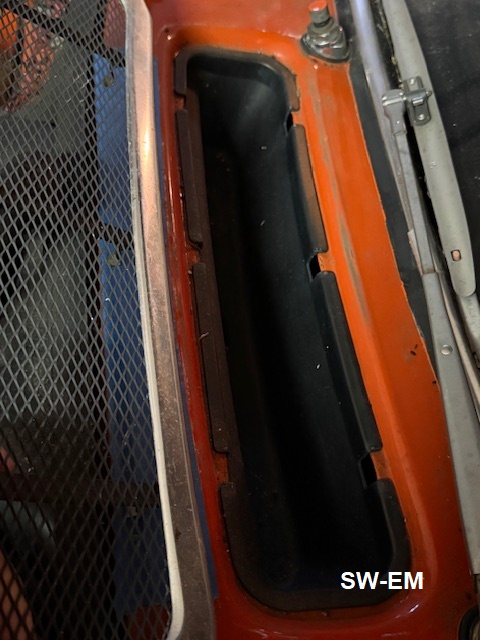
Cowl-Surround is removed, and Plastic Debris-Catch Tub with its six clearance
cut-outs for the Retaining Clips, comes to light. The Catch-Tub is the
second line of defense!
The tub has a single central drainhole , and a large opening for fresh air, flowing towards the front and Heater-Core.
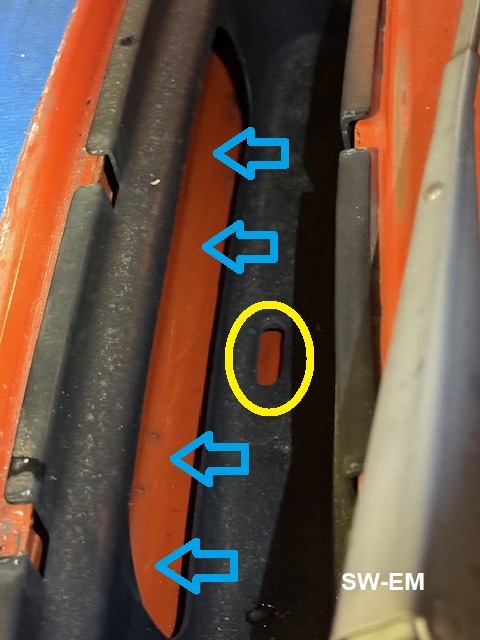
After removing Debris-Catch Tub by lifting out, state of the actual Cowl-Depression can be inspected. Here, part of one (closed) Fresh-Air Vents and one (of two) Drains Are visible. The top of Heater Core is forward of this view. It should also be checked for debris at this time (a mirror can help!) and can be carefully vacuumed out if necessary. The two Drains at the bottom of Cowl-Depression have factory fitted transparent Drainhoses in the engine compartment, which run down either side of the Heater Box, to terminate and allow drainage, just below the Brake System Lines at the back of engine compartment.
Fresh Air Vent shown open. Lots of random debris/ballast is in evidence in the depression.
Andi Somogyi picture. Permission Requested. In this picture, the Drains
and opening toward Heater Core are toward the Right!
Additional Information:
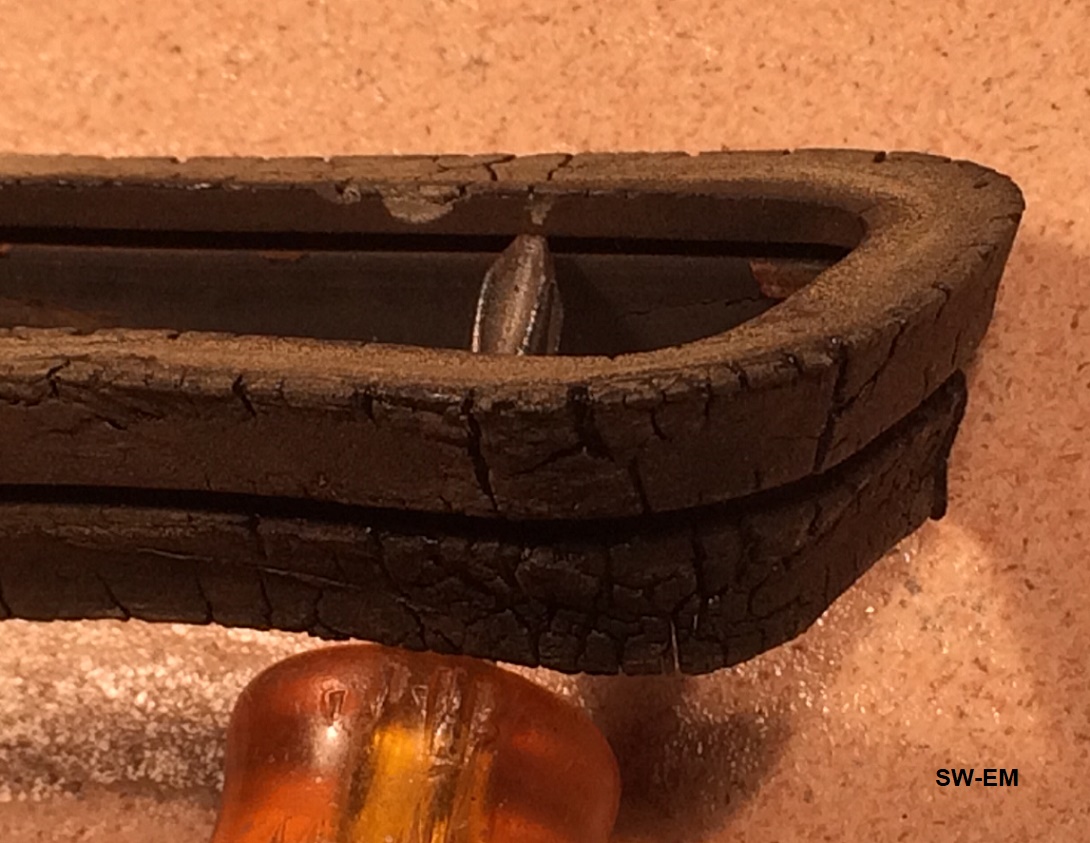
Formed Foam Ventseal exhibiting age-cracking, which surely decreases its sealing ability. Replacement Seals are available. Tip for installation: Warm these in hot water to maximize flexibility, and install with a film of general purpose RTV in the sealing groove
Fresh-Air Linkage:
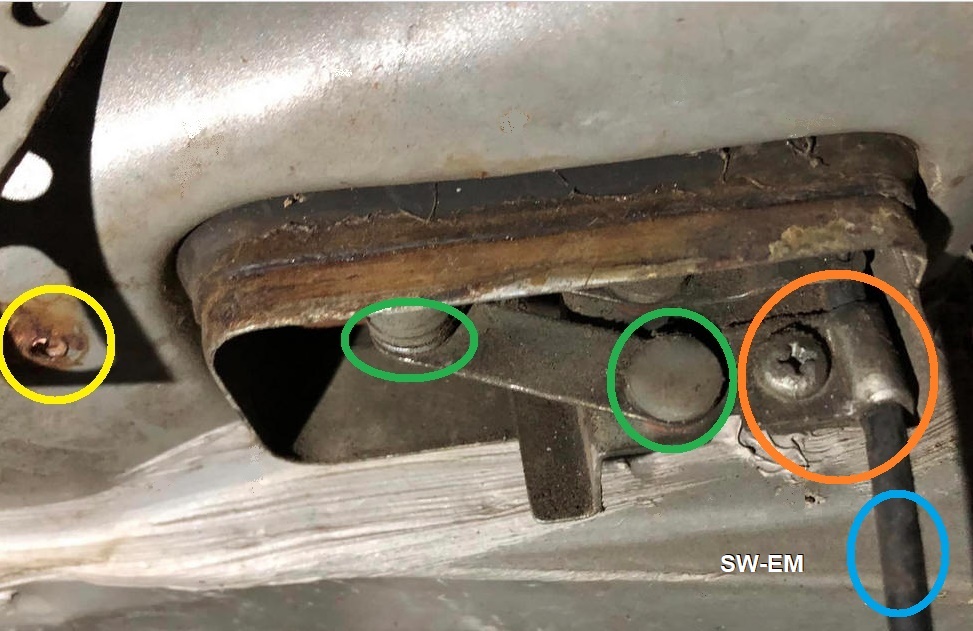
Viewed from below, if the Parallelogram Linkage of the Vent doesn't fully close, check for lost motion at either end of the Bowdon Cable (this is a common issue!)...make sure the 1. securing screws are tight, and Cable Sheath is fully captured at both ends and not pulling from the Sheathclamps ... 2. the cable itself is not sluggish due to internal corrosion and lack of lube... 3 the linkage pivots (only two of the four are visible here) could do with a bit of lube every decade (a spray-on lube like Tri-Flow if they are not apart, or a non-hardening, non-migrating grease like Super-Lube if they are apart and there is full access)...and finally: 4. haphazardly drilled holes in the bottom of the vent, for the purpose of supporting the back of a radio, or some other poorly thought-out reason, are a sure way to wet socks whenever it rains.
Fresh-Air Leakage and Temperature extremes: It's just as important to be able to fully close off the Fresh Air Vents when driving in colder conditions, as it is not to have Coolant leakage into the Heater Core in the summer due to slipping Hot/Cold Controls! Both need the Bowden Control Cables to be fully functional. See also:
https://www.sw-em.com/Heat_from_Heater_Defroster_when_Control_is_set_to_COLD.htm
-------------------------------------
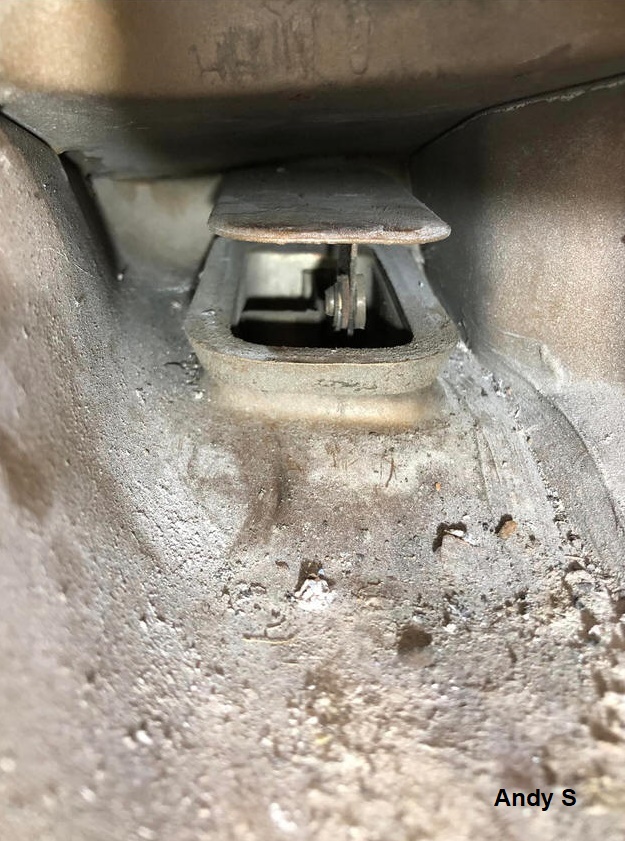
Rainwater Leaks by way of the 122 Airbox / Heater Core Enclosure: There are no Fresh-Air Vents directly from the Cowl Vent into the Passenger Cabin as in the 1800 considered above. Rainwater which falls into the fresh air Vent in front of Windshield, is supposed to drain away through fitting located at bottom of Airbox / Heater Core Enclosure, shown below, to which a drainage hose is connected and routed away at firewall in engine compartment (next to Ignition Coil). Sometimes, this drain is compromised by biomass which has also found its way into the fresh air intake through its grill. The simplest way to proceed is to first inspect, and verify if such a blockage is the cause. Because debris is cumulative, and depending on how many trees the car has been parked under in its lifetime, this is a good periodic maintenance operation. Remove the Blower Assembly from the Air Box in the engine compartment to get access (do this with care to avoid damaging the plastic air impeller, which is undoubtedly brittle after so many years. Inspect impeller once Blower Assembly is removed, and lubricate motor bushing. See Reference Info below), and inspect for bio-debris on top of Heater Core and in the area of fitting. Clear/vacuum any blockage debris (the shop-vacuum hose, modified with a flexible rubber hose extension will help!).
Drainage fitting can be seen below, on a stand-alone Airbox / Heater Core Enclosure (so from the firewall side), is this first line of drainage defense.
Some of the following pictures are by Derek of the VOC Forum, and used with his kind permission.

(Viewed from passenger compartment side!)
Yellow highlights Airbox rainwater drainage fitting.
If this rainwater drain is blocked and not allowing drainage to be routed away through hose in engine compartment, water level will rise to make its way into the second chamber of the enclosure, where Heater Core is located, down through/past Heater Core, and to the lowest point in the Enclosure, where it will drain out the drain intended for leakage from an incontinent Heater Core. This is a second line of drainage defense. This second drain hose, routes drainage through a hole in the transmission tunnel to under the vehicle, as seen below. If this second drainage provision is clogged or otherwise compromised (for instance by some well-meaning individual installing a carpet without realizing they dislocated it from its hole, or even removed that hose totally in the process of installing the carpeting), or even if this tiny hose is overwhelmed by a rain deluge (reader will note that rain Drainage Hose is a lot larger than Heater Core Drainage Hose!), water can/will make its way to the driver and/or passenger floor areas.
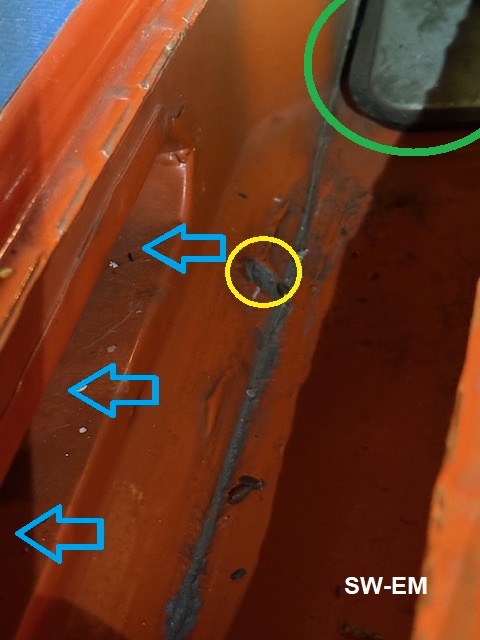
Below are pictures of this second drainage provision in the Heater Core Enclosure, as well as likely results of it not working as intended. Rust in bottom of enclosure suggests rainwater drainage was impaired (pooled Coolant would have the telltale green color and likely not have rusted as it contains anti-corrosives), allowing standing rainwater to pool, and rust the inside of enclosure, likely also spilling over onto the cabin floor as it reached the level of air vent (oval opening), as it appears to have done.

Heater Enclosure, with short drainage hose installed at
Yellow.

Location of drainage hole in transmission tunnel at Yellow. Heater Control Valve, another source of leaks into passenger compartment, this time Coolant, at Orange (see Condition 3 below!).
The critical part in question, actually consists of two components...the rubber hose (PN 661063, which can be installed with Enclosure in place), and a barbed insert, which expands the OD of the hose slightly, but definitely, to assure a water-tight seal with the Heater Enclosure. Unfortunately, installation of the securing barbed insert, must be made with access to inside of enclosure.

A nicely refurbished Heater Airbox with fitting and retaining insert installed.

-------------------------------------
Link to thread: Water ingress via heater airbox: https://www.volvoforums.org.uk/showthread.php?t=300775 (with many more useful pictures, including of the soft mounted Heater Core. While the original soft mounting foam is likely deteriorated at this point, Derek shows some nice alternatives for soft-mounting the thin and vibration-wear-susceptible(!) HC) The foam also prevents air from bypassing the HC and so assures a maximum temp exchange:

Heater Core, well protected from vibration damage by a foam wrap, and ready for Enclosure
to be buttoned up.
-----------------------
Coolant leaks from Heater Control Valve are considered here: Heater Control Valve
-----------------------
The Blower Motor of the Heater / Defrost System has a plastic impeller which is subject to breakage if the old, brittle plastic is mishandled (even only slightly!). Motor can also develop noise or howling, or be sluggish to start as bushings dry or wear. The Blower Assembly needs to be removed CAREFULLY, for access and although the bushing hidden behind impeller is difficult to access, applying lube with a snoozle will quiet this down effectively.
...further Information here: Blower Motor Notes
-------------------------------------
Externally sourced material is attributed. This information is Copyright © 2019-2026. Ronald Kwas. The term Volvo is used for reference only. I have no affiliation with this company, other than to try to keep its products working for me, help other enthusiasts do the same, and also present my highly opinionated results of the use of their products here. The information presented comes from my own experience and carefully considered opinion, and can be used (or not!), or ridiculed and laughed at, or worshipped, at the readers discretion. As with any recipe, your results may vary, and you are, and will always be, in charge of your own knuckles and future!
You are welcome to use the information here in good health, and for your own non-commercial purposes, but if you reprint or otherwise republish this article, you must give credit to the author or link back to the SwEm site as the source. If you don’t, you’re just a lazy, scum sucking plagiarist, and the Boston Globe wants you! As always, if you can supply corrections, or additional objective information or experience, I will always consider it, and consider working it into the next revision of this article...along with likely the odd metaphor and probably wise-a** comment.
